• Skip to primary navigation
  • Skip to main content
  • Skip to primary sidebar
  • Skip to footer
onecreativemommy.com
  • DIY/Crafts
    • DIY for the Home
    • DIY for the Garden
    • Crafts for Kids
    • Sewing Projects
    • Felt Food Tutorials
  • Parties/Gifts
    • All Party Ideas
      • Frozen Party
      • Harry Potter Party
      • Spy Party
      • Un-Slumber Party
      • Minion Party Ideas
      • Art Party
      • Princess Party
    • All Gift Ideas
  • Holidays
    • Valentine's Day
    • Halloween
    • Christmas and Winter
    • Thanksgiving and Fall
    • Fourth of July
    • New Year
    • Easter and Spring
    • St. Patrick's Day
    • Mother's Day
    • Father's Day
  • Recipes
    • Gluten Free
  • Tips & Tricks
    • Organization Tips
    • Cleaning Tips
    • Parenting Tips
    • Back to School
    • Cooking Tips
    • Gardening Tips
  • Printables
    • Bingo Games
    • Lunchbox Printables
    • Educational Games
    • LDS Printables and Lesson Ideas
  • Navigation Menu: Social Icons

    • Facebook
    • Instagram
    • Pinterest
    • YouTube
menu icon
go to homepage
search icon
Homepage link
  • Home
  • DIY & Crafts
  • Parties & Gifts
  • Holidays
  • Recipes
  • Tips & Tricks
  • Printables
    • Facebook
    • Instagram
    • Pinterest
    • YouTube
  • ×

    Home » Blog

    Roll Up Pencil Cases

    Published: Jan 29, 2021 by Heidi Fowler. This post may contain affiliate links 19 Comments

    Make these fun Roll Up Pencil Cases from Placemats! A perfect gift to keep kids occupied on the go! {OneCreativeMommy.com}

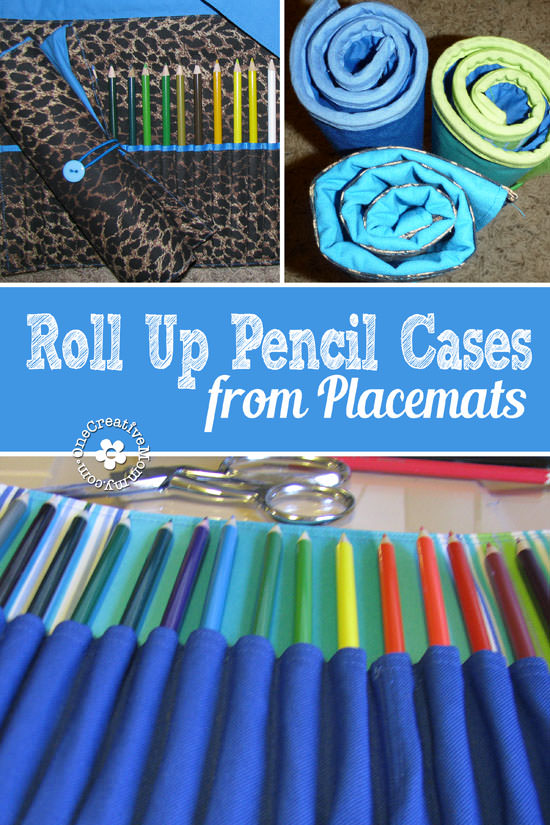
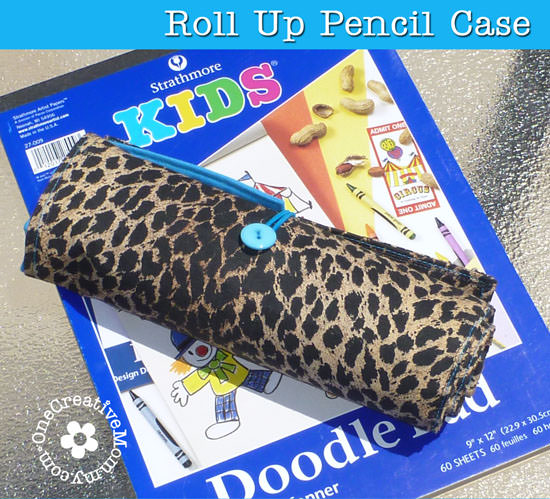
    One of my very first posts on this website was a tutorial for pencil rolls recycled from placemats.  This is still one of my (and my kids') favorite projects.  Since that post, I've made several as gifts, and I've made a few improvements.  Here's my latest and most favorite roll up pencil case (a more grown-up look for my 10-year-old):

    Tween Pencil Roll

    To see the complete tutorial for the original roll up pencil cases, click here.

    Here are the changes I made since the tutorial to make the rolls better:

    1.  I've stopped edging the rolls with bias tape.  It adds a nice edge, but it takes more time and adds more to the cost.  It's much easier to finish without the bias tape.  Just follow the alternate directions in step 7 of the tutorial to finish without the extra step.

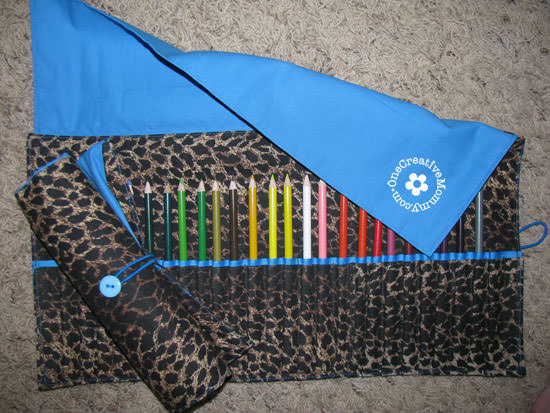
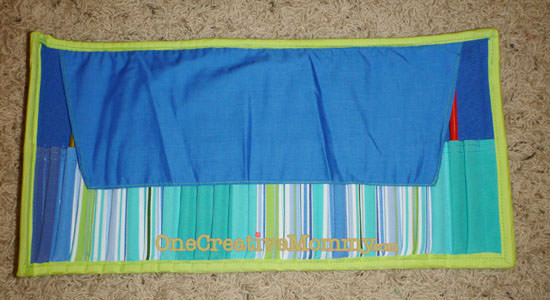
    2.  Once I realized that the pencils fall out when you turn the pencil rolls upside down, I started adding a piece of fabric that flips over the pencils when it's time to roll up the pencils and put them away.  In the above picture, I used a simple rectangular piece of fabric, but I altered it in the next picture so that the fabric doesn't stick out when the pencils are rolled up.  (Please forgive the wrinkles.)

    Fip fabric added

    This is one of the original rolls with the bias tape.  I unpicked the bias tape, added the flip-over fabric, and stitched the bias tape back on.  No more lost pencils!

    Make these fun Roll Up Pencil Cases from Placemats! A perfect gift to keep kids occupied on the go! {OneCreativeMommy.com}

    Thanks for stopping by!  While you're here, be sure to check out some of my other projects.  Images below are linked.

    Create the easiest magnet boards ever with this Picture Frame to Magnet Board tutorial {OneCreativeMommy.com}

    Recycle a milk jug into a watering can for the garden with the simple tutorial from OneCreativeMommy.com!

    Shop more quickly with this printable and editable grocery list from OneCreativeMommy.com. No more backtracking to find items you missed because your list was unorganized! {It's editable, too!}

    Click here to see all the fantastic sites I like to link up with each week.

    Heidi

    MORE IDEAS FOR YOU

    • Recipes
    • DIY & Crafts
    • Holidays
    • Parties & Gifts
    • Printables
    • Tips & Tricks

    Reader Interactions

    • Facebook
    • Instagram
    • Pinterest
    • YouTube

    About Heidi

    Hi! I’m Heidi, the sometimes scatterbrained, but always creative mind behind One Creative Mommy. I'm a retired teacher, wife, and mom of three beautiful teenage girls and one adorable fur baby. In my spare time, I love to share my ideas (mistakes and all) with anyone who will listen.

    Learn more about me →

    Comments

    1. Jodi

      July 28, 2012 at 1:08 am

      These are absolutely fabulous. What a clever idea.

      Reply
      • Heidi Fowler

        July 30, 2012 at 11:37 am

        Thank you! You made my day.

        Reply
    2. Jenni

      July 29, 2012 at 7:34 pm

      nice idea to make the edges angled in so they don't poke out after being rolled up!

      Reply
      • Heidi Fowler

        July 30, 2012 at 11:37 am

        Thanks. It took a lot of trial and error before I figured that out!

        Reply
    3. Sweet Green Tangerine

      July 30, 2012 at 11:27 am

      I LOVE THIS!! I must try this.

      Reply
      • Heidi Fowler

        July 30, 2012 at 11:37 am

        Thanks so much!

        Reply
    4. Kathie

      July 30, 2012 at 8:34 pm

      These are so pretty (and sophisticated). I wish I could sew! Thanks for linking up this week!

      Reply
      • Lucie

        August 24, 2012 at 8:08 am

        This would be a fun gift for a teacher who loans out pcneils or pens. In my middle-school classroom, I had to MARK my writing utensils so I'd get them back...with a distinctive topper like a fluff of curling ribbon. Something like this would have been super cute, especially with "Loaners: please return before you leave class" added on!

        Reply
    5. Nichi - The Mandatory Mooch

      August 02, 2012 at 3:50 pm

      My daughter would love this!! I'd love to have you link this up to Tasty Thursdays on The Mandatory Mooch. http://mandatorymooch.blogspot.com/2012/08/tasty-thursdays-2.html

      Thanks, Nichi

      Reply
    6. Brittany @ Crafty Mischief

      August 02, 2012 at 8:42 pm

      What a great idea! I made crayon rolls for my kids but they've been asking for bigger ones for pencils and markers. Looks like I need to take a trip to the dollar store for place mats. Thanks for sharing! :)

      Reply
    7. Mackenzie

      August 02, 2012 at 9:55 pm

      Cute! Thank you for sharing this at Saturday Show and Tell. I can't wait to see what you have for this week! I look forward to seeing you there.
      -Mackenzie
      http://www.cheeriosandlattes.com

      Reply
    8. Sarah Forhan

      August 03, 2012 at 6:50 am

      We love the pencil placemat roll-ups and so didn't our Bowdabra Blog readers. Congrats your link-up had the most clicks at our Saturday Showcase. Your craft project has been featured on our Feature Friday Post: http://wp.me/p1xtT7-3pY

      Thanks so much for stopping by and we hope to see more of your great craft tutorials on our weekly Saturday Showcase Link-Ups.

      Reply
    9. Sharon @ Elizabeth & Co.

      August 05, 2012 at 8:04 pm

      What a cute way to be organized!

      Reply
    10. Nichi - The Mandatory Mooch

      August 08, 2012 at 9:17 am

      Thanks so much for linking up to Tasty Thursdays at The Mandatory Mooch. I love this project and it will be FEATURED this week. Congrats!! Nichi - The Mandatory Mooch

      Reply
    11. Polaroid Art Set

      March 06, 2018 at 12:13 pm

      Can Be used for brushes and colors as well.

      Reply

    Leave a Reply Cancel reply

    Your email address will not be published. Required fields are marked *

    Primary Sidebar

    Hi! I’m Heidi, the sometimes scatterbrained, but always creative mind behind One Creative Mommy. I'm a retired teacher, wife, and mom of three beautiful teenage girls and one adorable fur baby. In my spare time, I love to share my ideas (mistakes and all) with anyone who will listen.

    More about me →

    Subscribe

    Popular

    • Olaf Sock Snowman Tutorial
    • Frozen Olaf Valentines {Free Printable}
    • Make your own storage lockers! {Perfect for kids}
    • 27 Creative Classroom Door Decorations for Valentine's Day

    Save Money

    Footer

    Privacy Policy

    Footer

    ↑ back to top

    About

    • Privacy Policy
    • Printables Terms of Use

    Newsletter

    • Sign Up! for emails and updates

    Contact

    • Contact

    As an Amazon Associate I earn from qualifying purchases.

    Copyright © 2022 OneCreativeMommy

    »
    «