


I have been dreaming about this project for over a year. It's finally a reality, and I can finally get rid of the mess you see below! (Picture me doing a happy dance.) Since we don't have a mudroom, this is what I have been using to store food, shoes, backpacks, coats, etc.
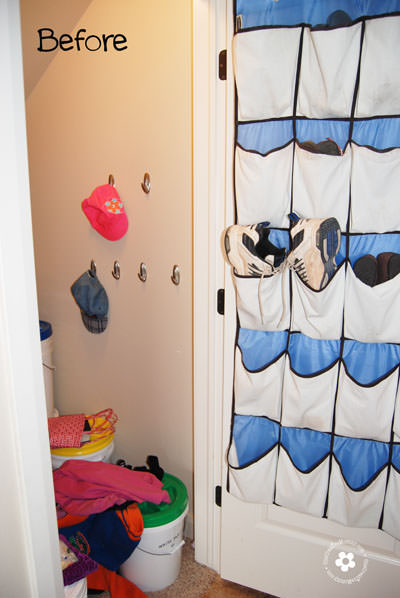
Those of you with sharp "Mommy" eyes, will notice that the shoe bags are almost totally empty, the hooks (which are on both sides of the closet) are lonely and longing to be used, and the floor is completely lost under the piles of food storage, coats, backpacks, shoes, socks and other miscellaneous junk that gets stashed in the closet.
As for the stacks of storage items that you can't see (piled all the way back under the stairs), they'd better be things I don't need often, because there is absolutely no way to get to them without a backhoe. And the best part? Because the hooks on the shoe bag go over the top of the door, the door is almost always open--giving all visitors and family members of lovely view of the disaster.
As you can probably tell, this is not my favorite room in the house!
Enter the idea of a storage locker. I found some easy plans that promised to be the perfect solution--with one tiny problem. I am not a builder. You aren't either? Good thing the plans I found on Ana-White.com are made just for people like us.
I was too chicken to start, but when my dad offered to help (or maybe I roped him into it), I was ready to give it a try. Guess what? I loved it! Not only did I love the finished project, but I loved building it. I see a Christmas list filled with power tools in my future!
Before I get to the instructions (which I know not everyone will be interested in reading), let me answer the question I know you all are dying to ask:
Do my kids actually use the lockers?
YES!!! They have a routine when they come home from school.
- Backpacks and sweaters get hung up.
- School shoes go on the bottom shelf so they are ready for the next day of school.
- Lunch boxes get emptied and put on the bottom shelf.
- It's time for snacks and homework.

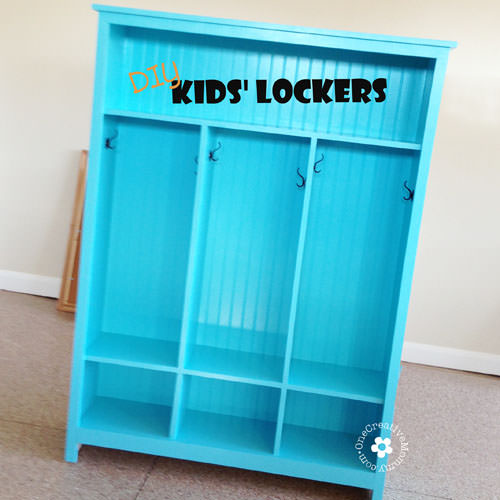
I love my finished lockers. (I think I might have mentioned that already.) I was a little nervous about the color (Rapids by Valspar), but now I absolutely adore it. It brightens up my kitchen, and I can't wait to add more color.
For those of you who want to try your hand at building, here's how I did it!
DIY Storage Lockers

Click here to go to Ana-White.com to download free building plans for the lockers
As usual, since I love my readers so much, I made sure to make as many mistakes as possible so that I could tell you what not to do! Isn't that nice of me? I know. I'm awesome like that. :)
For all of you building novices out there. The first thing you need is a Kreg Pocket Hole Jig. (I am not affiliated with the Kreg Jig company in any way. I just really love it!) You can build without it, but if you are a beginner with few tools, the jig will make your work so much easier!!! You can typically find the Jr. version for under $40, and it is well worth the investment.
I made a couple of changes to Ana's instructions. First, since I knew my kids would need individual cubbies on the bottom shelf, I added dividers there. If you want the dividers, too, you will need to add two 10 ½" cuts from your 1 x 12 board. (You won't need to buy extra. There is enough in the scraps from the project.) You only need to drill pocket holes on one side of these smaller shelves. Second, I chose to use bead board instead of plywood for the back of the unit. I love the way it turned out! Finally, there is one cut missing from Ana's plan. You will need a 45" cut from your 1 x 3 board. (This is the footer.)
Ready for my first mistake? I followed the first instructions to put together the outside box. Guess what happens when you try to add the third side? Unless you have some type of supports, the screws pull out of the holes, and your whole project falls apart. If you're lucky, the top board also hits you on the head! Obviously Ana White doesn't know me, or she would have included the following in her plans:
"Heidi--you're going to get hit over the head with a board, so you'd better sit down and do some planning before you start building!"
Thanks to my dad, who is great at planning, we came up with this chart. After you drill your pocket holes, put together the frame in this order. (This will not only help you avoid a giant goose egg, but it will also keep you from having to learn how to use the reverse function on your power drill. Honestly, I only had to take things apart once . . . or . . . maybe twice.)
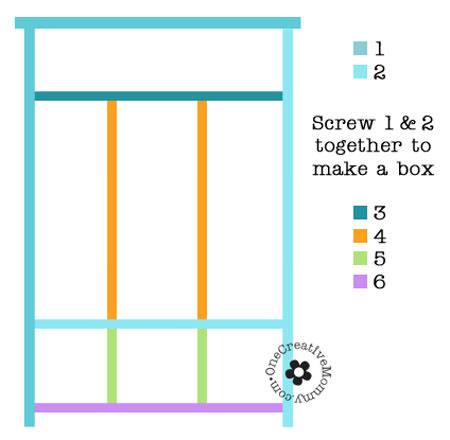 Screw together the top and one side (forming an L).
- Screw together the shelf above the bottom cubby and the other side (forming another L).
- Connect the two L's. You definitely need an assistant for this step!
- Add the top shelf.
- Add the large locker dividers.
- Attach the small locker dividers to the shelf above them. (Note. Unless you offset the pocket holes in the small and large dividers, you will be screwing the screws into each other. (For example--on the large dividers, make your pocket holes close to the outside edges, and on the small dividers, make your pocket holes close to the center.)
- Attach the bottom shelf to the sides.
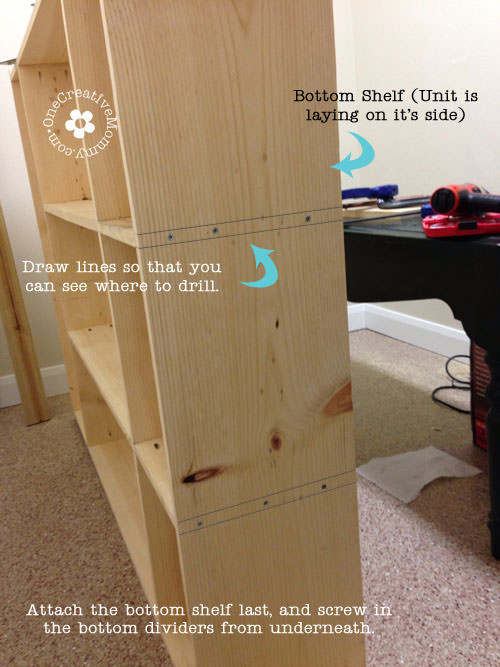
- Flip the project over, draw guide lines on the bottom shelf (pictured below), and attach the bottom shelf to the bottom shelf dividers through the underside of the board. (You can use pocket holes instead, but they will only work if you have a tiny, angled screwdriver. Otherwise, there is not enough room for the screw driver.)
From here, continue with Ana's original plans.
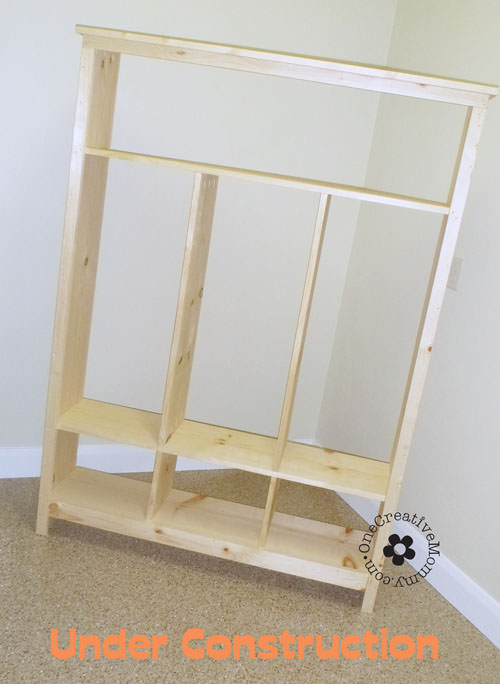
All that's left of the construction is the back. Then it's time to fill the holes, sand, prime and paint!
*Several people have asked the cost of this project. I spent under $150, but that included the $40 Kreg Jig Jr. that I used for the project. If you already have that tool, you can make it for less money. Ana-White.com suggests that this is a $100-$150 project. (It all depends on the type of wood and the brand of paint you choose.)
If you are interested in purchasing a Kreg Jig, you can check them out on Amazon.com. (I used the first one shown.):
I'll share some painting tips in another post. If you try this project, I'd love to see it!
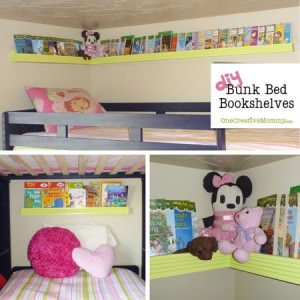
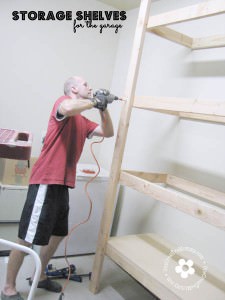
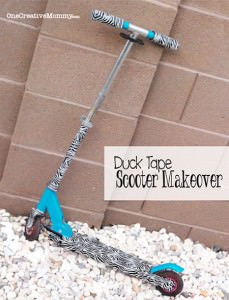
Want more projects? Try these (images are linked):
I'm glad you stopped by today. I hope you'll comment and/or share this post in some way!
Click here to see the places where I have been known to link up my projects and recipes.
![]()


Joyce
Heidi, this is amazing! Besides the utility, the beauty of the unit and the vivid color you chose are wonderful. But I am most impressed that you just took up that Pocket Hole Jig and went to work by yourself! Every home with school kids should have one of these - instead of the "backhoe" :) we usually resort to! Great job!
Heidi Fowler
I wouldn't have tried it without help. Having my dad with me (even though he was a beginner, too) was just the moral support I needed to get it done. I think he was as nervous as I was, but we both had so much fun. It was amazing how easy it was. I never imagined I could build something like that. Now I smile every time I walk by it! Thanks for your kind words! Take care.
jaimie
how much did this project cost?
Heidi Fowler
Including the $40 Kreg Jig, Jr. that I bought for the project, I spent about $150. The total cost will depend on the brand of paint and the type of wood you choose. Ana-White.com suggests that this is a $100-$150 project.
jaimie
THANK YOU!! my FIL is starting on it soon so I am looking forward to having it in my front hall by the end of this month! yay no more shoes, backpacks, books and random papers to walk on/step around right in my entry way! I've been dreaming about this for two years! thanks so much for the post and the links.
jaimie
and I forgot to mention that we added a fourth cubby since I have four kids. the cubbies will simply be more narrow.
Kristina & Millie
I need this. I think I need two. Think you could come over and help me build them? Totally awesome!
Heidi Fowler
Thanks, Kristina & Millie. I agree. I think everyone needs at least one of these! Wish I could help build it, but seriously--Ana White's plans are great for beginners. Give it a try!
Laura
What a great idea! I love being organised and hallways can easily become messy (especially with a lot of people in the house) so this really appeals to me! Thanks for sharing.
Heidi
Thanks Laura. It really was a fun project. Off to visit your site.
Brenna
I love this! It looks awesome! I'm adding this to my hubby build list, and then hopefully it will be done by the time the little one goes to school.
Heidi Fowler
I hope he'll do it, Brenna! You'll love it! Thanks for taking the time to comment.
Brenna
Thanks for sharing this will the Less Laundry, More Linking party, Heidi!
Crystelle
Oh my, Heidi! You are so my inspiration... That looks so hard, but it also looks so adorable AND functional! Great work... :)
hugs x Crystelle
Crystelle Boutique
Heidi
Thanks, Crystelle. I was pretty scared to try it, but with an "assistant" for moral support, it really went together fast. The Kreg Jig is so cool! Love your birthday project!
Diana Rambles
I love it. It's beautiful!!
Heidi
Thanks, Diana! I'm off to check out your S'more Pretzel Bark!
Meg @ The Patchwork Paisley
Swinging by from the Chic and Crafty party, I love these lockers!! My little ones don't have much school gear yet, but maybe I can use it to organize mind and the hubby's stuff- we have a severe storage shortage on out first floor.
Heidi Fowler
I replaced my dishes cabinet with these lockers. I'd much rather get rid of the dishes and have a clean house instead! Who needs fancy dishes these days, anyway! I think these would be great to organize adults, too. Go for it! Thanks for stopping by, Meg!
Kristina
Oh girl. I love this so much. If only My split level home had a spot where something like this could actually exist!!
Heidi@OneCreativeMommy
I had a hard time finding a spot, too, Kristina. This is actually sitting in my kitchen! It's worth it to me to have the storage. I wish it were in a mudroom, but I don't have one. Lemons to lemonade, right? :)
Nicky @ Pink Recipe Box
What a cute and creative way to help everyone stay organised at home! I'd be thrilled if you'd come on over to Pink Recipe Box and link up at Creative Wednesdays: http://pinkrecipebox.com/creative-wednesdays-with-pink-recipe-box-7/
Heidi Fowler
I stopped in at your party and linked up, Nicky. Thanks for the invite.
Monica
I love the way it turned out! When my boys get older I hope to do something similar. :-)
Pinned! If you have time, I'd love it if you would link this to Family Fun Friday - we have over 100 bloggers and 600 readers every week. :-) Thanks so much! Monica
http://happyandblessedhome.com/category/family-fun/
Heidi Fowler
Thanks, Monica! I'm all linked up.
Deb @ Kneaded Creations
Heidi! THis is FABULOUS! I am going to have the hubster help me to make one for our mud room! Your instructions are so understandable! I love it! Thanks so much for posting. You are one creative mommy! Deb@ Kneaded Creations
Heidi Fowler
Thanks so much, Deb. I hope you'll come back and share a link to your finished product!
Rachel @ I Love My Disorganized Life
Heidi I love this! I feel the same about woodworking, not too confident about it! Great job, girl!
Heidi Fowler
Thanks, Rachel. I'm off to enter your giveaway!
Gillian @ The Haas Machine
Super practical idea! I love everything that has to do with staying organized. Thanks for sharing!
Heidi Fowler
Thanks, Gillian! I'm off to enter your giveaway!
Claire
This is terrific, thanks! I can't find a cost estimate. Can you tell us how much you spent? Thanks again.
Heidi Fowler
I spent about $150. (That includes the tool I bought.) On Ana-white.com (where I got the instructions) the cost estimate is $100-$150. Since I didn't have all the tools, I spent $40 on the Kreg Jig Jr.
Madonna/aka/Ms. Lemon
I'm a foodie that came over from Sweet Sharing Monday, but i just wanted to say what a great idea and you and your father did an excellent job.
Heidi Fowler
Thanks, Madonna! It really was a fun project.
Christie - Food Done Light
This is awesome. I love that it looks so nice but is utilitarian also. Wish we had space for it. It would solve all my clutter issues by the dor.
Heidi Fowler
Christie, you should check out ana-white.com. She has lots of other storage plans to build. Maybe you'll find something that will work for your space. Thanks for stopping by and taking the time to comment! I'm off to check out your cookies.
Julie Moore
Totally awesome project and perfect for back-to-school! :) My kids would think those were amazing for sure! Thank you for linking it up to my Back-To-School link-up!
Jenifer @ Not Quite Mom of the Year
What a great project! I so wish I had room for a set of these! My hall closet looks like your before picture...only worse! Lol! Maybe I could get my husband to make them for my little girls' bedroom to hold towels and bathrobes!
Heidi Fowler
That's a great idea, Jenifer! My hall closet used to look a lot worse. You should see what it used to look like in the winter! I bet your girls could find lots of ways to use this in their room! I'm off to check out your site. Thanks for stopping in and commenting.
Krista @ the happy housie
This is truly an amazing project- and a great little tutorial too!! I love the blue colour you chose as well. I am sharing on my facebook page and would be thrilled if you have the chance to share this at our new mega-party Work it Wednesday - it goes live tomorrow morning at 7am PST. Each link will be shown on 4 blogs! The Happy Housie, The Blissful Bee, The Turquoise Home, and My Place for Taste:) Work it Wednesday. Hope to see ya there!
- Krista @ the happy housie
Heidi Fowler
You're so sweet, Krista! Thank you! I would love to link up. I'm on my way over now.
Krista @ the happy housie
Yay!! So thrilled you came to share this with us at Work it Wednesday this week - hope to see you back:)
Kathleen
Great job!!!! The color is fabulous. Pinned. New follower on all your social networks.
Heidi@OneCreativeMommy
Thanks, Kathleen! I'm following you back on Twitter.
Mandy Hank
This is amazing! It looks like you could purchase it at a store, you did a great job with the details! Totally pinning! I found you through Work it Wednesday and wanted to say hello!
Evelyn @ My Turn for us
Love these and I don't have kids but could certainly use them:)))
Just pinned and will be sharing on Facebook as one of this week's features at Freedom Fridays:)))
Hugs
Thanks for sharing!!
Heidi Fowler
Thanks so much Eveyln!
Danielle @ Poor and Gluten Free
Well you already know I love this post, and now I've pinned it! Thanks for sharing, Heidi :)
Heidi Fowler
Thanks, Danielle! I always love linking up at your site.
Kathryn Griffin @TheDedicatedHouse
Heidi, this is flippin' fantastic! Thank you for sharing. You will be one of the features today at the Make it Pretty Monday party at The Dedicated House. Pop on in and grab a feature button. Hope to see your prettiness again at the bash! Toodles, Kathryn @TheDedicatedHouse
Heidi Fowler
You're so sweet, Kathryn! Thanks so much for featuring my project. I've been linking up to your site for a long time, and I'm really excited that you chose my project!
Annie
Wow, great locker! Fantastic job!
Heidi Fowler
Thanks, Annie! I'm off to check out your site.
Katherines Corner
you rocked it! It's perfect!!! xo
Heidi
Thanks, Katie!
Mary Cole
Hello! I am planning to make this project this weekend, thanks for linking yours to the plan! It is so helpful!! I did have a quick question, did you have a nailer? I am wondering if I can get by without it..
P.S. Its gorgeous and awesome!
Heidi
Thanks, Mary. You definitely don't need a nail gun. Good luck with your project. I'd love to see it when it's finished.
Keith
What type of wood did you use? Looks like pine, but did you glue boards together to make them that deep or did you find them in the store that way?
Heidi Fowler
Hi, Keith. I used white wood, but pine would be even better (and more expensive). In the post, there is a link to the website where I got the printable plans. I added a download link icon so that you can see it better. If you visit that site, Ana gives you all of the dimensions of the boards to buy and the cuts you need to make. Good like!
Denyse @ Glitter, Glue & Paint
Heidi! What a great way to keep the kids organized. Thank you for sharing at Throwback Thursday!
xoxo
Denyse
Heidi Fowler
Thanks, Denyse!
Sabrina @ PLN
Thanks so much for sharing your project on our #PARABlogCrew link party. Love what you did! The colour looks amazing:)
Heidi Fowler
Thanks. The color makes me happy!
Karen W
That looks like a wonderful way to organize! I could have used this years ago, though we don't have room for something like that right now.
Thanks for stopping by and sharing with Throwback Thursday Blog-Style. I can't wait to see what you share this week.
Heidi
Thanks, Karen. We don't have a lot of room, either, but this fit perfectly into a little spot in the kitchen.
Natashalh
I was actually thinking of converting a bookcase into a sort of entryway piece with space for shoes, coats, etc. We don't have kids, but this looks like it would really meet our needs! Plus it would give my husband an excuse to get the pocket hole jig he's been wanting for months.
Heidi Fowler
The pocket hole jig is so cool! If getting a new tool will get you a new entryway piece, it's worth it!
Heidi
Heidi, I am getting to build this locker system this weekend. I have all my wood and Jig and paint and am sooo excited. I didn't see a link to painting tips. Do you have a link or ideas. I'm wondering if I should paint some pieces before putting together.
Valeria B.
This is really convenient for kids! I love it! Thanks for sharing! Greets, Storage Marks Gate Ltd.
AnneMarie
You give great instructions! Plus, I love the humorous warnings~ that would totally happen to me ;)
jon
Hello,
this was helpful, thank you. do you have any information on how much weight the lower shelf will support? i know my kids and they will be crawling on them.
Heidi
Sorry, Jon. My kids are too old for climbing, so mine bottom shelf has only held shoes and books. The middle shelf has held quite heavy backpacks, though. The unit seems quite strong, but you might have better luck with weight information by asking on Ana White's website (the place I link to get plans). Good luck with your shelves!
english to spanish translation
that looks great! gotta try to make it!
hotmail login problem
The color of the house decoration is very important to me
skype online
they’d better be things I don’t need often, because there is absolutely no way to get to them without a backhoe. And the best part? Because the hooks on the shoe bag go over the top of the door, the door is almost always open–giving all visitors and family members of lovely view of the disaster.
surveillancekart
Teaching your kids organization skills early on will help them take better care of their belongings, at home, and in school. it will Help kids get organized!
Ally
My husband just used your plans to build a locker for us. I will share a picture as soon as it's finished. But I was wondering what storage ins did you use on the bottom shelf. I'm having a tough time finding ones that I like and that are affordable.
Heidi
Congrats, Ally! I hope you love your new lockers. I know just what you mean about finding inexpensive bins. I did not want to break the bank either. It's been several years, but I'm pretty sure mine came from Walmart. I'm sure they were very inexpensive, because I hate spending money! I hope they still have some the right size that will work for you. Good luck!
LILA
Great ideas, i love your article. It gives me more ideas on home to organize my room with my shoes and stuff for my children.
Keep up the good work
bing rewards sign up
If the Microsoft account connected with your phone is the same one you use to sign in to Bing Rewards, then you’re probably already earning credits when you search on your phone. Go to Rewards dashboard on desktop to know your credits status
helix jump
AWesome website, Love the way this website has been done. Love it. Great work.
Kelly
We at Totally Kids fun furniture & toys actually have damaged furniture from time to time and this is a great inspirationk. Glad that I found your site!
Kelly
van điện từ
Great ideas, I love your article. It gives me more ideas on home to organize my room with my shoes and stuff for my children.
Laura Miller
Hi! I really like the color of your walls. Could you tell me what color it is? Thanks!Laura
Heidi
Hi, Laura. Unfortunately, the walls were that color when we moved in, and we don’t live there anymore. I wish I could help. There wasn’t any touch up paint or anything, so we never saw the color on a paint can or anything. Sorry.
We just painted our new home Agreeable Gray, and I absolutely love it. It sounds like you are looking for more of a cream color, though. Wish I could help.
On a side note, the color in my pics looks a little off (it was hard to get good lighting in that house). Even if I did have the color, you may have found that it was different than you expected. It was a nice color, though, so maybe not.
I hope you find just the right color for your home. Choosing colors is so hard!
IAS Coaching In Delhi
It looks awesome.