

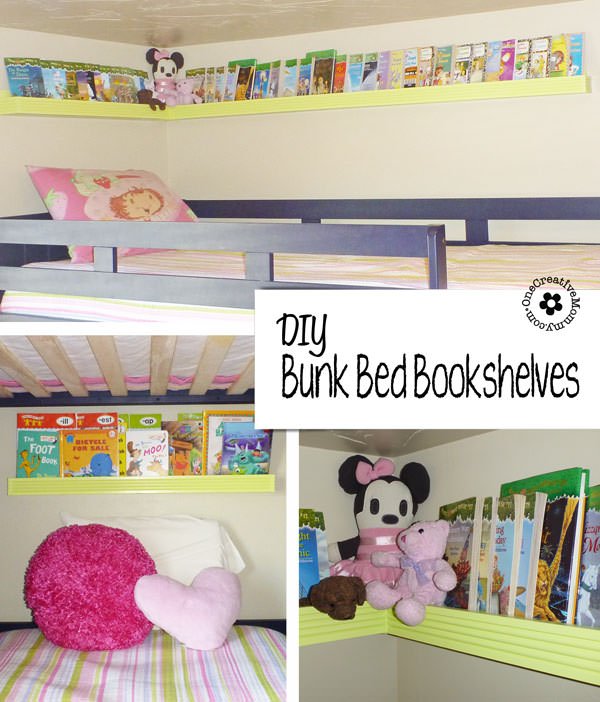
Ready for a DIY project to organize the junk that collects on your kids' beds? This step-by-step Bunk Bed Bookshelf Tutorial will have you cleaned up in no time! If you've been looking for bookshelves for kids, you've come to the right place.

I have heard that some kids sleep with teddy bears. Mine sleep with books! They love to read in bed, but they don't love to put the books away. As a result, books get smashed and bent up, and sometimes I wonder how the kids even find room to sleep! When you combine that with stuffed animals, things can get pretty crazy. When we got bunk beds, I decided it was time for things to change.
Thanks to great tutorials all over the web, my dad (who helped me build), and my hubby (who helped me put the shelves up), I created this solution:
Forward-facing, pocket-style bookshelves for kids bunk beds
(You could easily adapt these for any wall or bed.)
Materials:
- Enough 1x4 boards to fit the length of your desired shelf/shelves (used for the back of the shelves)
- The same length of 1x3 boards (used for the bottom of the shelves)
- The same length of wood trim (or 1x2 boards) for the front of the shelves. You will need 4 extra inches to cap off the sides of each shelf. (That's 8 extra inches for the L-shaped shelf, and 8 extra inches for each additional shelf you build.) I used something like this (I thought the left side would make the front look cute for a girls' room):

House of Fara
¾ in. x 3-¼ in. x 8 ft. MDF Flute Casing
I got mine from the scrap pile at Habitat for Humanity Restore. I did have to buy one large piece for the long wall from a hardware store, but I was able to use scraps for the other pieces. (The scraps cost me $.20!)
- Hammer and finishing nails
- Wood glue
- Saw and miter box
- A helper is nice, but it is possible to do this by yourself. (I made the small shelf alone.)
- For finishing--caulk, wood filler, sandpaper, primer and paint
I have tons of pictures, but they are all taken in my dark kitchen with my dark counter top. Sorry! That's my work station. Hopefully, the diagrams will help.

Using the miter box and saw, cut your boards to the desired size. Pictures start after this step. Start with one shelf and then move onto the next. I am starting with the short half of the L-shaped shelf.

- Lay your pieces out like the diagram so that you can tell where to put the glue!
- Spread a bead of wood glue on the bottom inside edge of the 1x4 and the small edge of the 1x3.
- Put the pieces together and nail into place. If your boards are long, it really helps to have a helper. Unless you're better at this than I am--which you probably are--the glue will likely run all over. Use a damp paper towel or cloth to wipe it off as you go.
- Nail down the entire length of the boards--making sure place a nail in each corner.
- (Not pictured) Use a sharp screw or countersinking tool to hammer the nail below the surface of the wood.

- Spread a bead of glue across the bottom inside edge of whatever wood you choose for the front of the shelf, and spread another across the remaining short side of the bottom 1x3.
- Put the pieces together, hold them firmly, and wipe away access glue.
- Nail the trim or 1x3 into place.
Repeat these steps with the boards for the long piece of the L-shape.
Now it's time miter the edges so that the pieces will meet in the corner and finish off the edges.

Once you have finished both pieces, lay them out in the L-shape and mark the ends that meet to form the corner of the L. (You will cut those edges at a 45 degree angle so that they will create a nice corner. You may want to lightly draw a line in the direction of your cut so that you don't make a mistake. (*Warning! Your walls might not be square. If you are really good at this stuff and know how to match the angel of the wall to the angle of the wood--you are much more skilled than I am. My husband and I made our own fix that I will show you later.)

- Using a saw and miter box (or if you're really lucky, a real miter saw), cut the edges you marked at a 45 degree angle. (Make sure you have the direction of the angle right before you cut!) *Warning! This shelf is too tall for most miter boxes. You will have to get creative to make the cut all of the way through. It is possible, though!
- Check to make sure you mitered the corners correctly.
- Measure the depth of your shelf and cut scraps of trim or 1x3 to cap the ends.
- Following the same directions as before, glue and nail the pieces to the outside ends of the shelves, and countersink the nails (pictured). If you are using wood trim, be very gentle when you nail the two pieces of trim together. They split easily. (If they split, just fix the split with wood glue and clamp them together to dry.)
- Finished edges should look something like the picture.
It's time to finish and put up the shelves! *Important! When you mount the shelves on the wall above the top bunk, the bottom of the shelf should be at least 14 inches above the bed railing to avoid bumped heads! (This shelf is deeper than the shelf for the bottom bunk.)
- Fill in nail holes with wood filler, let it dry and sand.
- Prime and paint.
- Attach shelves to the wall with 3" screws into the studs.
- If your walls are not square, purchase a small metal plate and some paintable caulk to fill the hole.

If you can't get the pieces to meet in the center, trim off part of the back corner of one shelf. Screw the plate into the corner to even up the two shelves. Fill the hole with caulk. Prime and paint the metal plate, screws and caulk.
You are done! Stand back and enjoy.


Now try a shelf for the bottom bunk.

Since this shelf will be right above your child's head, make it as narrow as possible. (See the diagram.) This is as narrow as I could make it and still have enough room to hold books.

My girls love these shelves, and their beds are so much cleaner! (If only the shelves would help them put away their clothes!)
Thanks Dad and Steve for helping me finish this project!

I'd love to see what you make with this tutorial. I hope it's helpful to you! If you like this idea, please "like it," "pin it," "google+ it," or share it in some way so that others can enjoy it too. I'd also love it if you followed my site in some way. Thanks for visiting.
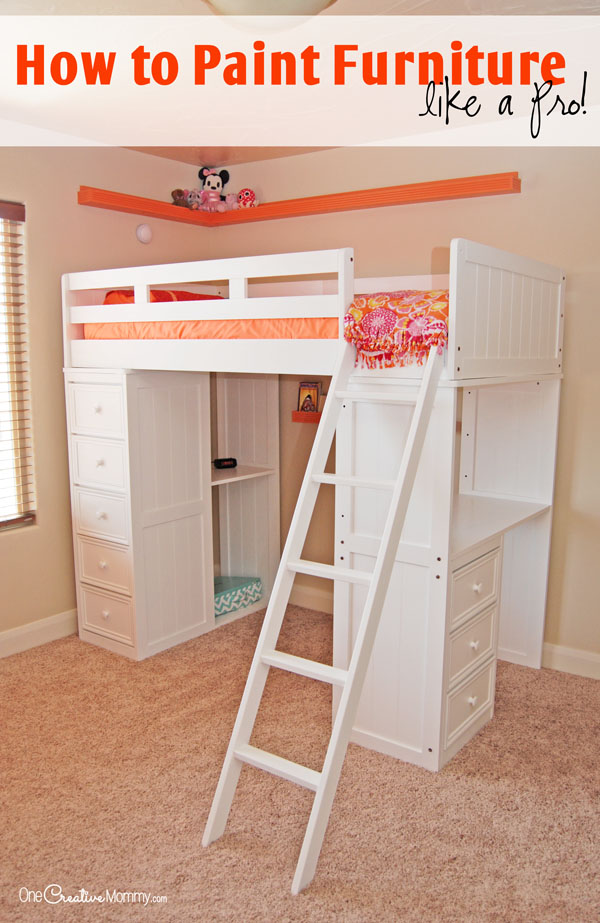
These shelves (and the bed) have had a makeover! Check out the new look:
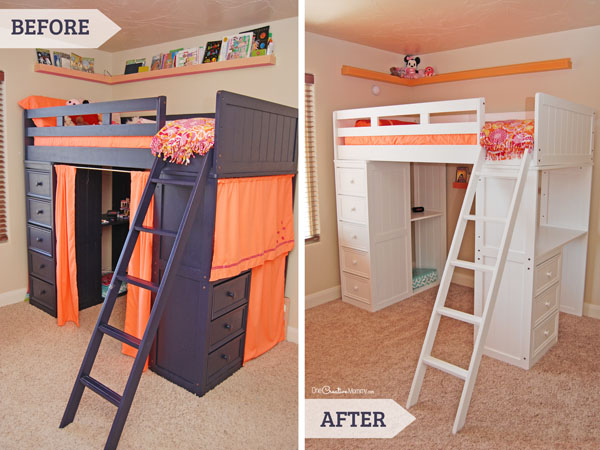
Want to read about the changes? Check out the posts by clicking on the images below:


Steph @ Crafting in the Rain
I've made some similar to these...but there's not as long, and they're just white. Yours totally rock!
Caren
Love, love, love this! You can never have too many bookshelves.
Thank you so much for linking up to the Smart Solutions Party!
Monica
These are beautiful. I want some for my room!
Nicole@Show Off Friday
That is a great idea! Our kids love books and we can never have too many shelves.
Rebekah
Those are fantastic....I totally want some for my daughters' room.
Claire @ The Rustic Pig
WOW! So fun!!! My boys would LOVE this!!! Thanks so much for linking up at The Rustic Pig's Creatively Tuesdays! Hugs!!
Christine
This is just fabulous. My daughters always sleep with a bunch of stuff on them. Great solution!
Thanks so much for sharing this at The DIY Dreamer.. From Dream To Reality!
Jessi @ Practically Functional
Those are great, so useful and simple! And great tutorial. Thanks for sharing at The Fun In Functional!
Jessi @ Practically Functional
I'm just stopping by to let you know I featured this today on my blog! Congrats! You can check out the feature and grab a brand new Featured button here: http://practicallyfunctional.net/2012/10/the-fun-in-functional-link-party-20/
Jen
Cute! I did something similar with my boys beds and love it. They need a place for their "junk"!
Susie at Earning-My-Cape
Those are great! Hee hee... my kids sleep with books too!
Jill
Great bookshelves! My kids used to sleep under their books too - great piles of them all over the beds! I ended up making hanging fabric pockets for theirs!
Thanks for linking to a Round Tuit!
Hope you have a fabulous week!
Jill @ Creating my way to Success
http://www.jembellish.blogspot.com/
Carrie
What a great idea!! I love it!! Thank you for sharing at Sharing Saturday!
Evelyn
Guess who is being featured at Freedom Fridays Blog Hop this week??? I’m not telling:) Lol
Christa
My girls, ages 2 and 8 also love to sleep with books. What a great idea. Thanks for sharing.
Kathie
Now, this is a smart idea. My girls accumulate books, papers, & all sorts of art supplies. They have separate twin beds but the shelf by the bed would still work. Thanks for sharing the tutorial at Gettin' Krafty With It!
andiejaye
those turned out great! i love the detail on the trim you used! cute that the lower bunk got on too! thanks for linking up to tip-toe thru tuesday!
Kathryn Griffin
How fantastic! Thank you for sharing this at my Make it Pretty Monday party at The Dedicated House. Hope to see your prettiness again on Monday. Toodles, Kathryn @TheDedicatedHouse
K @ Claiming Our Space
I swear I need some of these above my bed. :-) I can't tell you the number of times I have woken up with my face pressed into a book. Thanks for sharing on Tout It Tuesday! Hope to see you tomorrow.
Ewa
the bookshelf looks great! and that photo with a little one sleeping is so sute!
Sharon @ Elizabeth & Co.
What an awesome project and a fabulous tutorial!
Evelyn
I shared this post on Facebook, pinterest and twitter today:) Thank you for sharing at Freedom Fridays!
Gina
I love this! My girls sleep with books too. Love that picture of your girl and her books! So sweet. :)