• Skip to primary navigation
  • Skip to main content
  • Skip to primary sidebar
  • Skip to footer
onecreativemommy.com
  • DIY/Crafts
    • DIY for the Home
    • DIY for the Garden
    • Crafts for Kids
    • Sewing Projects
    • Felt Food Tutorials
  • Parties/Gifts
    • All Party Ideas
      • Frozen Party
      • Harry Potter Party
      • Spy Party
      • Un-Slumber Party
      • Minion Party Ideas
      • Art Party
      • Princess Party
    • All Gift Ideas
  • Holidays
    • Valentine's Day
    • Halloween
    • Christmas and Winter
    • Thanksgiving and Fall
    • Fourth of July
    • New Year
    • Easter and Spring
    • St. Patrick's Day
    • Mother's Day
    • Father's Day
  • Recipes
    • Gluten Free
  • Tips & Tricks
    • Organization Tips
    • Cleaning Tips
    • Parenting Tips
    • Back to School
    • Cooking Tips
    • Gardening Tips
  • Printables
    • Bingo Games
    • Lunchbox Printables
    • Educational Games
    • LDS Printables and Lesson Ideas
  • Navigation Menu: Social Icons

    • Facebook
    • Instagram
    • Pinterest
    • YouTube
menu icon
go to homepage
search icon
Homepage link
  • Home
  • DIY & Crafts
  • Parties & Gifts
  • Holidays
  • Recipes
  • Tips & Tricks
  • Printables
    • Facebook
    • Instagram
    • Pinterest
    • YouTube
  • ×

    Home » DIY & Crafts » DIY For the Home

    How to Make Brass Hardware Look Like Oil Rubbed Bronze!

    Published: Jan 29, 2021 by Heidi Fowler. This post may contain affiliate links 5 Comments

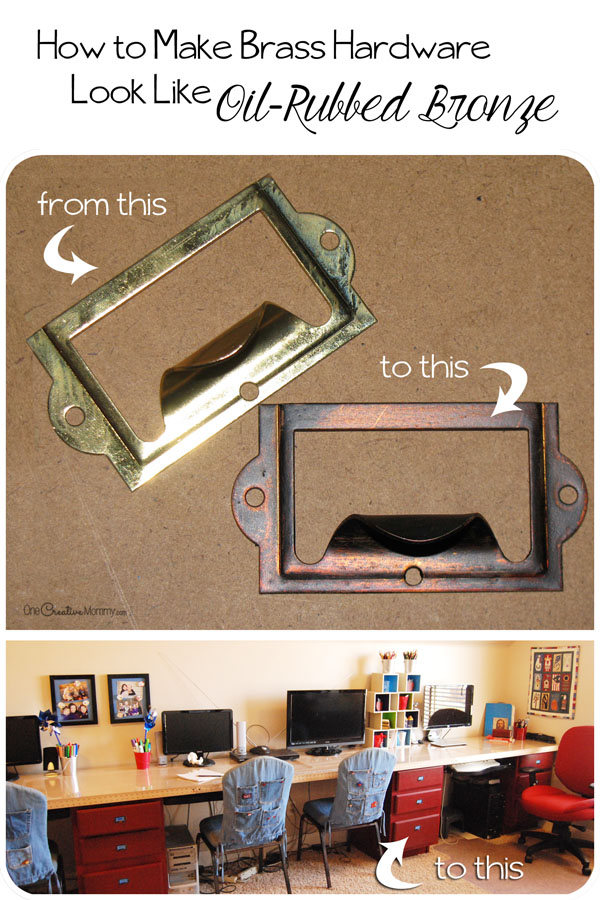
    I transformed the drawer pulls for the new family computer desk from brass to oil rubbed bronze.  Pretty cool, huh? If you love the look of your hardware, but you hate the brass look, you can do this, too!

    How to make brass hardware look like Oil-Rubbed Bronze! {Easy Tutorial on OneCreativeMommy.com}

    RELATED: Painting Tips for Unfinished Furniture, DIY Storage Lockers for Kids

    Want to know how to do it?

    First, spray your entire project with Glossy Wood Tone 757 by Design Master.  This is a floral spray, so look for it in the floral section, not the paint section.  This will give your brass a coppery look.  The advice I was given for that spray is to spray lightly from far away, and add multiple coats until you get the color you like.

    *Very important tip:  Do not leave the spray can anywhere that Lu (or fill in the name of your toddler) can reach it.  Even if you put it up high and turn your back for just a second, you may be surprised to find your "Lu" crouched in front of your project holding the spray can and poised to spray!

    Next, apply a coat of  Ebony Rub 'n Buff by Amaco.  This is a wax metallic finish.  It smells suspiciously like shoe polish.  The Rub 'n Buff is tricky.  It dries really fast, and if you rub too much, it comes right off.  I think it must be made for things you don't touch very often--like picture frames, lamps, etc.

    Finally, apply several coats of clear acrylic coating to seal the Rub 'n Buff.  (I used UV-Resistant Clear Acrylic Coating by Krylon.)  I also used this same method on the tops of the nails I used to attach the pulls to the drawers.

    It is still possible to scratch the finish, but I don't have any idea how to fix that.  Maybe varnish--but I don't want the pulls to look varnishy.  If anyone has any ideas to make them totally scratch resistant, please let me know!

    You can see the whole desk inside this post:

    Build a Family Computer Desk on a Budget! {I made mine almost completely with second hand materials} OneCreativeMommy.com

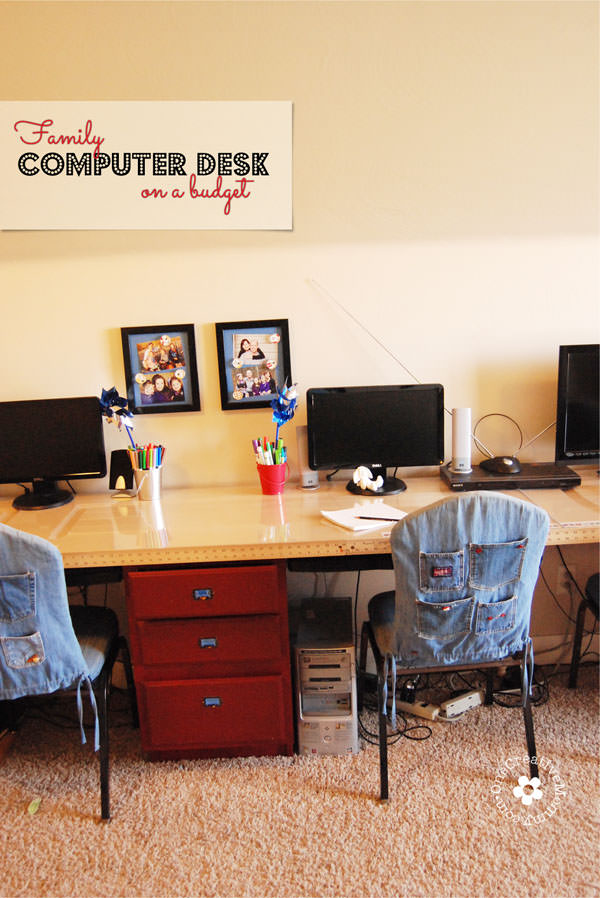
     How to Create a Family Computer Desk on a Budget

    Want to see some of the other projects in this room? We were going for a school theme.

    Desk Chair Makeover and Easy Slip Cover Tutorial
    Create the easiest magnet boards ever with this Picture Frame to Magnet Board tutorial {OneCreativeMommy.com}
    Easy Picture Frame Magnet Boards
    Let your kids fill the walls with inexpensive Crayon Wall Art! {Garage sale frame + a few boxes of crayons = fun!} OneCreativeMommy.com
    Crayon Wall Art

    *Don't forget.  You almost never have to pay full price at craft stores.  Before you buy, go online and get a coupon!  Most craft stores will accept other craft store coupons.  I'm such a cheapskate that I'll go to the store several times in a day or a week and buy just one item for my project at a time.

    Thanks for stopping by today. I hope to see you again soon!

    Heidi

    MORE IDEAS FOR YOU

    • Recipes
    • DIY & Crafts
    • Holidays
    • Parties & Gifts
    • Printables
    • Tips & Tricks

    Reader Interactions

    • Facebook
    • Instagram
    • Pinterest
    • YouTube

    About Heidi

    Hi! I’m Heidi, the sometimes scatterbrained, but always creative mind behind One Creative Mommy. I'm a retired teacher, wife, and mom of three beautiful teenage girls and one adorable fur baby. In my spare time, I love to share my ideas (mistakes and all) with anyone who will listen.

    Learn more about me →

    Comments

    1. Misty

      June 07, 2012 at 1:53 pm

      These are so cute! So inspiring! Thanks so much for linking up to Ta-Da Tuesday
      ~Misty
      413 Sparrow Lane

      Reply
    2. terry

      June 10, 2012 at 10:44 am

      Great tutorial and what a fabulous difference. Love the oil rubbed bronze look. Thanks for sharing at our party this week.

      Reply
    3. Liz @ The Brambleberry Cottage

      June 13, 2012 at 2:18 pm

      Great job. Heidi! I am NOT a fan of bright, shiny brass, so I love your idea.

      Thanks for sharing at Time Travel Thursday. I hope you'll join the fun each week. Be sure to stop in tonight to see yourself featured.

      Blessings,
      Liz @ The Brambleberry Cottage

      Reply
    4. essential oils

      November 27, 2016 at 9:24 am

      hi
      I think different oil use different people because it depends on a male , female you should be consult with the doctor

      Reply

    Leave a Reply Cancel reply

    Your email address will not be published. Required fields are marked *

    Primary Sidebar

    Hi! I’m Heidi, the sometimes scatterbrained, but always creative mind behind One Creative Mommy. I'm a retired teacher, wife, and mom of three beautiful teenage girls and one adorable fur baby. In my spare time, I love to share my ideas (mistakes and all) with anyone who will listen.

    More about me →

    Subscribe

    Popular

    • Olaf Sock Snowman Tutorial
    • Frozen Olaf Valentines {Free Printable}
    • Make your own storage lockers! {Perfect for kids}
    • 27 Creative Classroom Door Decorations for Valentine's Day

    Save Money

    Footer

    Privacy Policy

    Footer

    ↑ back to top

    About

    • Privacy Policy
    • Printables Terms of Use

    Newsletter

    • Sign Up! for emails and updates

    Contact

    • Contact

    As an Amazon Associate I earn from qualifying purchases.

    Copyright © 2022 OneCreativeMommy

    »
    «