• Skip to primary navigation
  • Skip to main content
  • Skip to primary sidebar
  • Skip to footer
onecreativemommy.com
  • DIY/Crafts
    • DIY for the Home
    • DIY for the Garden
    • Crafts for Kids
    • Sewing Projects
    • Felt Food Tutorials
  • Parties/Gifts
    • All Party Ideas
      • Frozen Party
      • Harry Potter Party
      • Spy Party
      • Un-Slumber Party
      • Minion Party Ideas
      • Art Party
      • Princess Party
    • All Gift Ideas
  • Holidays
    • Valentine's Day
    • Halloween
    • Christmas and Winter
    • Thanksgiving and Fall
    • Fourth of July
    • New Year
    • Easter and Spring
    • St. Patrick's Day
    • Mother's Day
    • Father's Day
  • Recipes
    • Gluten Free
  • Tips & Tricks
    • Organization Tips
    • Cleaning Tips
    • Parenting Tips
    • Back to School
    • Cooking Tips
    • Gardening Tips
  • Printables
    • Bingo Games
    • Lunchbox Printables
    • Educational Games
    • LDS Printables and Lesson Ideas
  • Navigation Menu: Social Icons

    • Facebook
    • Instagram
    • Pinterest
    • YouTube
menu icon
go to homepage
search icon
Homepage link
  • Home
  • DIY & Crafts
  • Parties & Gifts
  • Holidays
  • Recipes
  • Tips & Tricks
  • Printables
    • Facebook
    • Instagram
    • Pinterest
    • YouTube
  • ×

    Home » Blog

    Terra Cotta Pumpkin Makeover

    Published: Dec 27, 2021 by Heidi Fowler. This post may contain affiliate links 31 Comments

    Love these cute Terra Cotta Pumpkins! Use them as Jack O'Lanterns for Halloween, or turn them around for plain pumpkins for Fall. {OneCreativeMommy.com}

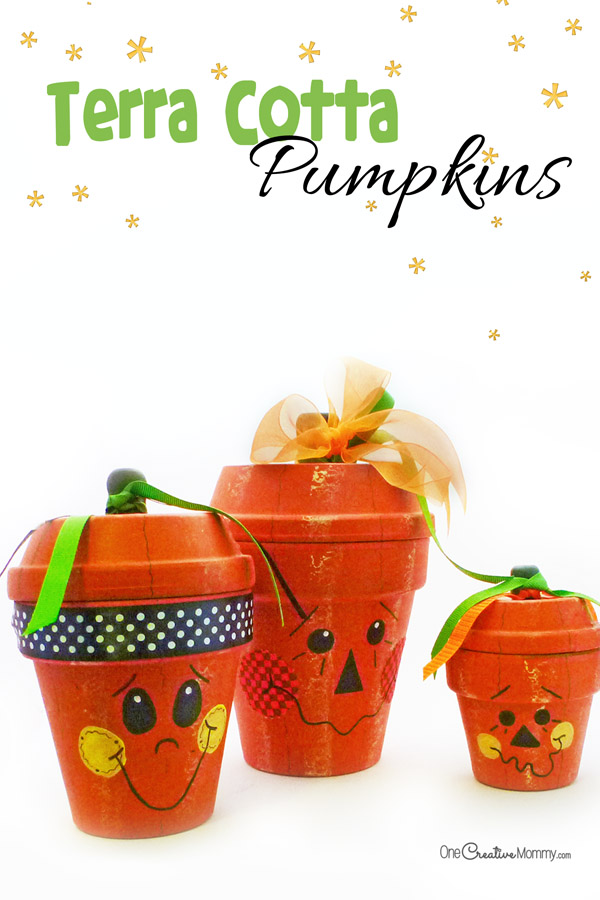
    Sometimes even a favorite project needs a makeover.  I made these Terra Cotta Pumpkins when I was first married.  I've used them for years (the fine cracks on the tiniest lid prove it), but this year, I decided to do a little updating.  What do you think?

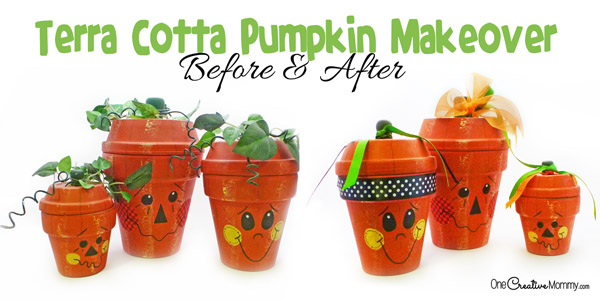
    They started out looking like this.  I like them, but the leaves and things seem a little out-of-date.

    Terra Cotta Pumpkins before the makeover {OneCreativeMommy.com} Fall Decor

    Remove the leaves, add a few ribbons, and here they are now:

    Love these cute Terra Cotta Pumpkins! Use them as Jack O'Lanterns for Halloween, or turn them around for plain pumpkins for Fall. {OneCreativeMommy.com}

    Which do you like better?

    Cute but outdated terra cotta pumpkins get a fresh new look with a quick and easy makeover! Love this fall decor! {OneCreativeMommy.com}

    Want to make your own?

    1. Prime and then paint the pots and lids with your favorite orange craft paint.
    2. Add stripes using a sponge and yellow or light orange craft paint.  (Don't overfill the sponge, and dap lightly.)
    3. Add faces with craft paint, fabric and a black sharpie or paint pen.  (You don't have to do the details with paint.  The markers work just fine.) (Round stencils are helpful for the eyes and cheeks.)
    4. Add fine details to the stripes and cheeks with a fine-point permanent felt-tip marker.
    5. Create the stems with wooden spools or other wooden shapes.   (Paint them green or just leave them the color of the wood.)
    6. Add ribbons, leaves, buttons, etc to your heart's content!

    Terra Cotta Pumpkins {OneCreativeMommy.com}

    I'd love to see your version of this project!

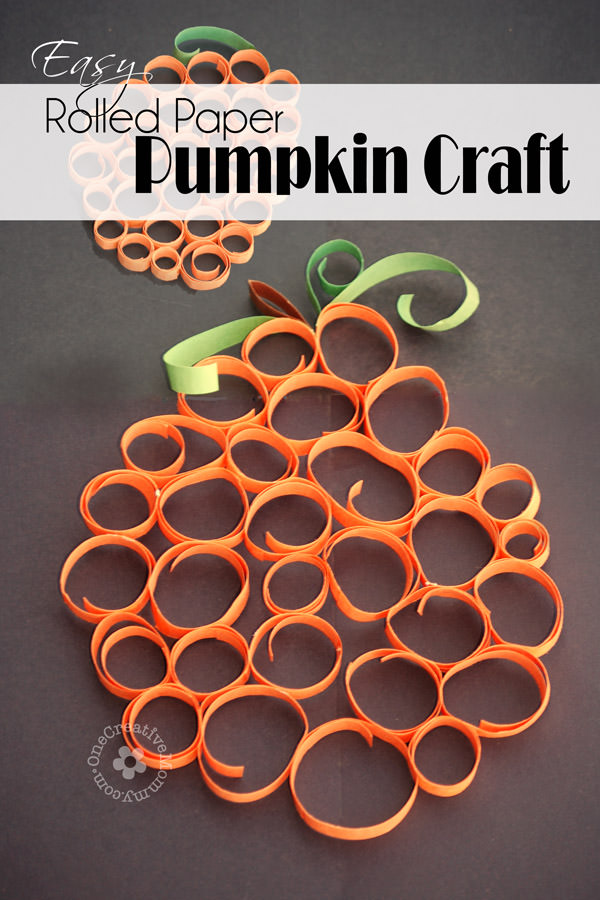
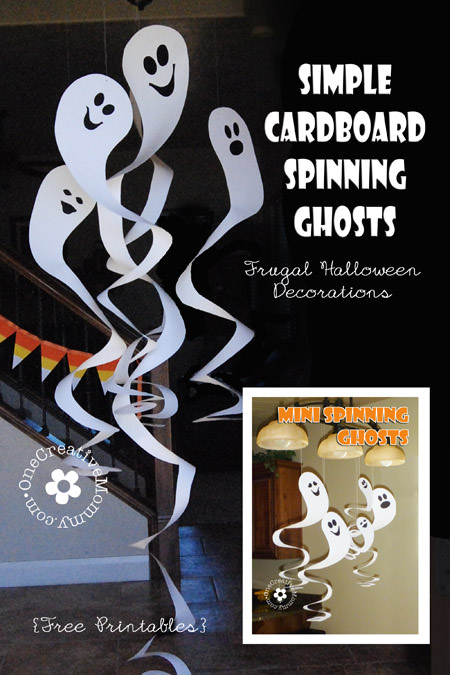
    Thanks for stopping by today. Be sure to stick around and check out some of my other projects. Click on the images below to visit the posts.

    Easy Rolled Paper Pumpkin Craft {Perfect Fall Craft for Kids!} OneCreativeMommy.com #fallcraft #pumpkin #kidscraft

    Cardboard Spinning Ghosts tutorial and free printable from OneCreativeMommy.com

    Pier 1 Inspired Halloween Feather Tree {OneCreativeMommy.com} #feathertree #halloweendecor

    Heidi

    MORE IDEAS FOR YOU

    • Recipes
    • DIY & Crafts
    • Holidays
    • Parties & Gifts
    • Printables
    • Tips & Tricks

    Reader Interactions

    • Facebook
    • Instagram
    • Pinterest
    • YouTube

    About Heidi

    Hi! I’m Heidi, the sometimes scatterbrained, but always creative mind behind One Creative Mommy. I'm a retired teacher, wife, and mom of three beautiful teenage girls and one adorable fur baby. In my spare time, I love to share my ideas (mistakes and all) with anyone who will listen.

    Learn more about me →

    Comments

    1. Sew-Licious on Facebook

      October 16, 2012 at 6:48 am

      So lovely! You are invited to post your project at SHOW-licious Craft Showcase. Just follow the link then grab the button to participate each week!
      http://sewliciousdecor.wordpress.com/2012/10/14/sunday-craft-showcase-3.

      xoxo, Marti

      Reply
    2. Erin

      October 17, 2012 at 9:59 am

      So cute! I just love their cute faces!

      Reply
    3. Carmella Calhoun on Facebook

      October 17, 2012 at 10:00 am

      Love everything I am seeing here! newest like! ~ Creative Carmella

      Reply
    4. Steph @ Crafting in the Rain

      October 17, 2012 at 3:43 pm

      Cute--love the ribbons on them :)

      Reply
    5. Marti

      October 18, 2012 at 9:08 am

      Thank you for your submission! : )

      Reply
    6. Jill

      October 18, 2012 at 10:07 pm

      Very cute little pots!

      Thanks for linking to a Round Tuit!
      Hope you have a fabulous week!
      Jill @ Creating my way to Success
      http://www.jembellish.blogspot.com/

      Reply
    7. Jill @ Create.Craft.Love.

      October 19, 2012 at 4:43 pm

      OMG - Those are absolutely adorable! Thanks for sharing at the Pomp Party! Hope to see you back next week!

      Reply
    8. Katherines Corner

      October 20, 2012 at 9:07 am

      Love, love, love this fun craft. Thank you for sharing at the Thursday Favorite Things blog hop. Wishing you a beautiful weekend xo

      Reply
    9. Ewa

      October 20, 2012 at 4:09 pm

      they look so cute :)

      Reply
    10. Jessi @ Practically Functional

      October 21, 2012 at 3:06 pm

      Too cute, what a great idea!

      Thanks for linking this up to The Fun In Functional!

      Reply
    11. Roxana GreenGirl on Facebook

      October 21, 2012 at 9:22 pm

      Greetings from A little bit of everything Nice "seeing" you at online BlogCon. Looking forward to your posts.

      Reply
    12. Trish - Mom On Timeout

      October 22, 2012 at 10:52 pm

      These are just ridiculously cute Heidi! Pinning! Thanks so much for sharing at Mom On Timeout! Hope to see you back this week! - Trish

      Reply
    13. Katie

      October 23, 2012 at 10:35 pm

      How cute!

      Reply
    14. Summer

      October 24, 2012 at 2:37 am

      What a cute idea! I'm going to have to make some of these for my house. Thanks for sharing :)

      Reply
    15. Susie at Earning-My-Cape

      October 24, 2012 at 1:03 pm

      Hi! Congratulations! You won the Most Clicked On feature at my Super Link Party! Come on by, check it out, and grab your feature button! :-)
      http://earning-my-cape.blogspot.com/2012/10/super-link-party-24.html

      Reply
    16. Christina at I Gotta Create!

      October 24, 2012 at 7:38 pm

      You are a STAR! Featuring you today. These are so doggone cute. Thanks so much for linking up at I Gotta Create! <3 Christina

      http://igottacreate.blogspot.com/2012/10/10-quick-last-minute-halloween-projects.html

      Reply
    17. Karen

      November 02, 2012 at 11:37 am

      I love this project. I am pinning this and am also your newest follower! Cheers.

      Reply
    18. Deb

      October 05, 2015 at 5:39 am

      I like both, but the original are my favorite. Thanks

      Reply
      • Heidi

        October 05, 2015 at 10:47 pm

        Thanks, Deb. I'm glad to hear that the originals are looked nice. Especially since they looked like that for about 15 years!

        Reply

    Leave a Reply Cancel reply

    Your email address will not be published. Required fields are marked *

    Primary Sidebar

    Hi! I’m Heidi, the sometimes scatterbrained, but always creative mind behind One Creative Mommy. I'm a retired teacher, wife, and mom of three beautiful teenage girls and one adorable fur baby. In my spare time, I love to share my ideas (mistakes and all) with anyone who will listen.

    More about me →

    Subscribe

    Popular

    • Olaf Sock Snowman Tutorial
    • Frozen Olaf Valentines {Free Printable}
    • Make your own storage lockers! {Perfect for kids}
    • 27 Creative Classroom Door Decorations for Valentine's Day

    Save Money

    Footer

    Privacy Policy

    Footer

    ↑ back to top

    About

    • Privacy Policy
    • Printables Terms of Use

    Newsletter

    • Sign Up! for emails and updates

    Contact

    • Contact

    As an Amazon Associate I earn from qualifying purchases.

    Copyright © 2022 OneCreativeMommy

    »
    «