
What spy birthday party would be complete without a big bang? (A pretend one, at least.) Our Top Secret Spy Mission during Lu's spy birthday party led to this Time Bomb Piñata. We explained that we were able to stop the timer at 37 seconds, but the agents needed to disarm the bomb. It's a pull-string piñata, so the agents just had to each grab a string and pull. Presto! The bomb is disabled, and the kids get the spy candy hidden in the bomb.
I saw this idea on Pinterest, but when I clicked through to get to the blog, there were no instructions, so I had to make it up on my own. You can check out my inspiration piñata here at Robkimmeldesign.
Because I had no instructions, this project took many, many hours. I started with a square design, then switched to a triangle. I've done all the trial and error so that it won't take you as long to make. (If you live in my area, I might even let you borrow mine!)
This is a pull-string piñata. That means that all the kids get to open the piñata at the same time, and no one is left out. (That's my favorite kind of piñata.) As a kid, I always hated not getting a turn because the piñata was broken by the first kid in line. With this type, everyone gets a chance.
Time Bomb Piñata Tutorial
RELATED: Paint Can Piñata Tutorial, Spy Party Ideas
Materials:
- 1 cardboard box (Ideally, it should be between 9 and 11 inches tall. Shorter is okay, but not taller.)
- Lots of red cardstock (I bought a whole package. It's cheaper than buying by the sheet. I used 19 pieces, but the number you need will depend on the size of your box.)
- A box cutter or craft knife
- 1 large roll of black duck tape
- Electrical wire in two colors (You can buy it by the foot at the hardware store)
- Hot glue
- Double-sided tape
- Scotch tape
- White paint pen (I used an Elmer's Painter)
- Small box (like the long, skinny white boxes that sometimes come with necklaces)
- 1 sheet of black cardstock or construction paper
- Red ribbon
- Black electrical tape (you can do without this, but use it if you have some on hand)
Now, let's get started!
Create a Triangular Box
Using a box cutter, very carefully remove one side of your box and the top and bottom flaps. (Save the pieces for later.) You now have three sides of a box. Fold the outside pieces together to form a triangle, and tape the sides together with black duck tape.
Use one of the triangular open ends as a tracing pattern. Trace the outside of the triangle twice on your scraps of cardboard to make a top and a bottom for your triangle. Cut out the triangles.
Before you attach the top and bottom pieces to your box, cover one side of each (the side that will face out) with duck tape. Measure inside each triangle about an inch or or two, and cut two edges of a smaller triangle inside the big triangle to make a window in the top and the bottom of the box. (See the image above.) Fold the window out on the black tape side. (Kind of hard to explain that step! Hopefully, you can see what I mean by looking at the picture.)
Using black duck tape, tape the triangles over the open holes of your box.
Create your "Dynamite"
My box is 9 inches tall, and my dynamite sticks are 10 inches tall. Decide what height of dynamite looks good with your box. (You can't go taller than 11 inches, because the paper is only 11 inches long.) Trim several pieces of paper to the height you want. (Don't trim them all, because you don't know how many you need yet.)
Roll each piece of red paper into a tube and secure the edge with clear tape. Stack the tubes along the outside edges of the box to determine how many you need. Cover the open end of each tube with black duck tape.
Once all of the tubes are finished, work with one set of tubes at a time (one side of the triangle). Tape the tubes together in a line with black duck tape across the center, and then tape that to the side of the box. Repeat with the other two sides. Tape across the top and bottom of the sets of tubes.
Create Your Timer
Cover your small box with black cardstock. I used a candy box and cut it down to make this smaller box. I used double sided tape to make it stick tightly to the sides.
The numbers were created with the Alarm Clock font. I printed the numbers on cardstock and then painstakingly cut out the letters with an x-acto knife to make a stencil. I then placed the stencil on the black cardstock and filled it in with a white painter marker. I could have used my Silhouette, but I didn't have any white vinyl. In hindsight, I still could have created the stencil with the Silhouette! What was I thinking?
Attach the completed timer to the bomb with hot glue. In addition to the hot glue, I used black electrical tape in a few spots to make it more secure.
Cut your electrical wire into short lengths. Tuck (and tape when necessary) one end of each behind the timer, and then attach the other end somewhere on the dynamite. (I mostly tucked mine in behind the duck tape.
Finish Off the Openings
Top: Poke a hole through the top flap an inch or so behind the point. Thread both ends of a short length of ribbon through the hole into the inside of the box and tie a knot. Securely tape the knot to the inside of the top flap. You should end up with a short loop on the outside that will allow you to open and close the flap.
Bottom: Cut a small 1 ½ inch wide strip of cardboard and lay it across the inside of the flap, just below the point. Securely tape the strip in place, and then fold the edges that are sticking out in toward the center of the box. When you stuff the flaps inside the box and close the flap, the strip of cardboard should keep the piñata closed until it's ready to be disarmed.
Cut several long ribbons -- enough for one ribbon for every guest with a couple extra, just in case a little brother or sister drops in just as you're ready to open the piñata. Poke a hole through the center of the bottom flap, and thread the end of one ribbon into the hole. Securely tape the end down on the back of the flap. This ribbon is the key to opening the piñata. It has the firmest grip and will be strong enough to open it.
Tape the remaining ribbons along the outside edge of the flap, and close the flap. If it does not stay closed, reach in through the top and unfold the strip of cardboard so that the edges stick out and keep the flap from opening.
Fill it Up with Spy Candy!
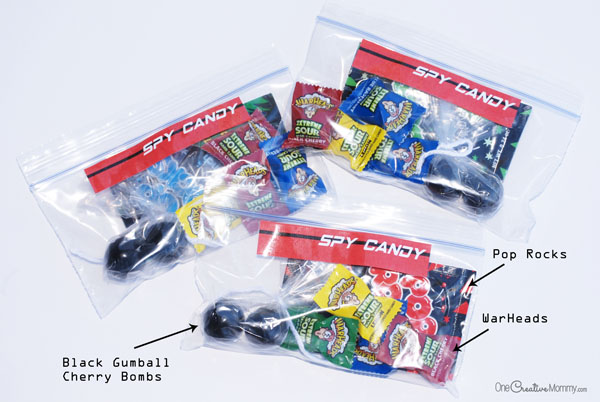
I filled my piñata with individual bags of candy. I always hate it when one kids gets tons of candy and some kids get none. To solve that problem, I make a bag for everyone (and a few extra). Maybe it's less fun, but I'm not a big fan of tears!
We used black gumballs, pop rocks and super sour WarHeads candy.
Hang it Up and Let the Kids Disarm It!
To hang the piñata, poke two holes in the top of the piñata (not on the flap). Thread a strong string or rope through and secure it with knots on the inside. Hang the piñata over a tree branch. If you don't have a strong tree (like me), dangle it over a broom handle and have one or two tall adults firmly hold both ends of the broom high above the kids' heads.
(We found out the hard way at our Princess Party that it is crucial to hold both ends of the broom. When the kids pull on the ribbons, their pull is pretty hard. If you are not holding both ends of the broom, the lose end comes down quickly and might just bop a kid! Ouch!)
When it's time to begin, let every kid grab one ribbon (make sure someone has a hold of the key ribbon), count to three, and let them pull!
VERY IMPORTANT: If you plan to reuse your piñata at a future party, make sure you put the piñata away after the kids dive for the candy. I had a few overzealous secret agents who didn't understand that a pull-string piñata does not have to be demolished. I about had a heart attack when I turned my head to see two kids tearing the piñata apart. Luckily, I stopped them before they did too much damage. (The squashed part is mostly hidden in the pictures.) You live. You learn.
That concludes my Spy Birthday Party posts. For all those planning to use these ideas, I hope you have fun. We sure did!
Check out some more party ideas by clicking on the images below.


krista
This is an awesome pinata! What a creative idea, and I love the pull string kind, especially for indoors! I'm glad you caught it before it got destroyed!
Heidi
Thanks, Krista. I was absolutely horrified at what the kids were doing at first. Then I took a deep breath and realized that they had probably never seen a pull-string pinata and just through that all pinatas are supposed to be pulverized when you're done!
Marilyn Clark
Heidi, this spy party totally ROCKS!!! I absolutely love the ticking time bomb idea for a pinata....you are so clever!
Heidi
Thanks, Marilyn. I copied a picture I saw on pinterest. They posted a pic of the pinata from their party, but they didn't tell how to make it.
Camille
Love this pinata! I really like these pull ones instead of the smashing kind- someone always gets hurt- plus this goes great with the defusing the bomb idea. Glad you were able to rescue it!
Heidi
Oh, me, too, Camillie. I remember when someone put a hole in our wall when we tried a pinata in the house as teenagers. Yikes!
Marie
This is a fantastic idea! My kids are still a little young to be into the spy thing yet but I am definitely going to pin it for when they are!
Heidi
Don't you love how pinterest easily lets you save ideas for later? Hope your kids love it in a few years.
Marie
Absolutely, Heidi! As sad as it is to say, I legitimately worry about what I would do if Pinterest suddenly went belly-up! So many things I want to try and not enough time to try them all!
Heidi
I know just what you mean, Marie. There are so many recipes that I have never printed out. I just go to the pin and click through to the website every time I make them. I definitely need to write some things down!
Bethany
Oh my goodness! This is such a fun idea! I would have never thought of a Time Bomb Piñata. Pinned!
Heidi
Thanks, Bethany. It took a lot of work, but it was definitely a hit!
Nina Lewis
This spy theme is so cute. We have a family reunion at the end of the month and I think I'll use that as my theme. The grandkids will love it. Thanks so much for sharing at my Grandma Ideas link party.
Heidi
I bet the grandkids will love that theme! What a nice grandma you are!
marianne
oh my God! you saved my daughters birthday. thx a loooooooooot!