
Are you ready for the Felt Food Roundup coming September 6th? Here's another tutorial to get you started: Felt Popsicles (Skill Level: Beginner--but more difficult than pancakes)
 You will need:
- Felt
- Coordinating or matching embroidery thread and needle
- Popsicle stick(s)
- Fleece and/or felt scraps for filler
- Thick cardboard (I used a piece of cardboard box), optional
You will also need to know how to sew a basic blanket stitch or whip stitch. Links to video tutorials can be found on my felt sandwich post.

Begin by printing out your pattern:

Free Popsicle Patterns (with Bonus Creamsicle Pattern) from OneCreativeMommy.com
Choose the popsicle size you like, lay it on top of two layers of felt in your chosen color, and cut it out. Cut a ½" strip of felt to go along the edges. (I have put approximate lengths on the pattern.) *Hint--a paper cutter will slice felt! That's how I got mine straight.)

- (See blanket stitch image.) Lay the strip on top of the popsicle shape so that the edges are even. Begin toward the bottom of one side, and stitch around the entire shape, using a blanket or whip stitch. When you get back to where you started, slip your needle under your first blanket stitch and pull it through. (This should finish the edging so that you can't tell where you began and ended.
- Using your fingers, pinch the two sides of the strip together and stitch the pieces together. Finish by knotting on the inside.
- Cut extra felt, fleece, or batting slightly smaller than the popsicle shape to use as stuffing. (Optional--If you want your popsicle to keep it's shape instead of flopping over, cut a piece of strong cardboard to use as stuffing along with the fabric.) In this tutorial, I used fleece, felt scraps, and cardboard. Make a stuffing sandwich: Fleece, cardboard, fleece.
- Using sharp scissors, snip a hole in the bottom of the strip--just large enough to slide a popsicle stick inside. Lay a piece of fleece and the cardboard inside your popsicle, slide in the popsicle stick, and tape it to the cardboard.
- Surround the popsicle stick with a layer of filler.
- Add the second piece of fleece.
- Add the second popsicle shape and blanket or whip stitch it in place the same way you did in step 1.

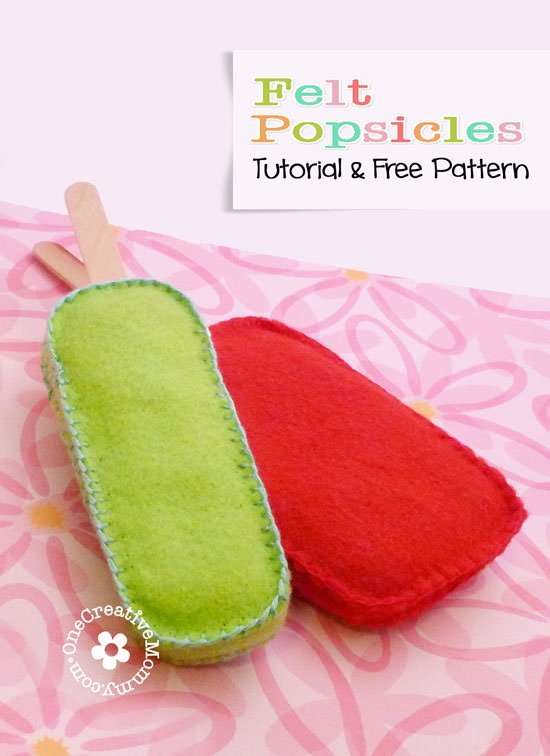
8. You're done! Start over with a new color or shape. Just FYI--the red popsicle pictured in the first image does not have a piece of cardboard inside. It is much more flimsy than the green popsicle, but it is softer.

If you ever wondered--and I'm sure you have--this is what happens when you leave your fleece filler pieces and a threaded needle on the table unattended for five minutes. I actually took the picture after spending five minutes untangling. You'll have to imagine the even larger mess! Thanks, Lu, for reminding me what not to do! Glad you enjoyed yourself. (She was so proud of herself! She said, "Look, Mom! I sewed it up for you!")
Be sure to come back early next week for the creamsicle (pictured below) tutorial. (Oh, no! I forgot to post the creamsicle tutorial! I'll get it posted as soon as I can.) The pattern is included in the free download linked above. I hope to see you all (and your projects) on September 6th! (I'll have linkup categories for desserts, fruits and veggies, sweet treats, everything else food, and non-food felt items.)

Interested in more felt food tutorials? Check these out:


If you enjoy this idea, please "like," "Pin," or "+1" so that others can join the fun! Thanks!
Click here to see all the fantastic sites I like to link up with each week.
This project was featured on these great sites:


Carrie
These are great!! I would love it if you would share them at my link party Sharing Saturday. It will open on Friday night at 9 at http://craftymomsshare.blogspot.com/.
Jen W.*
Oh I love handsewing and this looks fun!
Ruth at number 29
always on the look out for play food. than k you! pinning!
Amanda
Very Cute! I always love original felt food creations!
Katie Drane
What a cute idea! And your pics are very helpful, thanks for that:)
Katie
http://www.funhomethings.com
Natasha
WOW!! these are like, amazing!!!! can't believe how good they look. you did a brilliant job!!!
would love if you could share this on my link party Serenity Saturday, that runs from sat-thurs @ http://www.serenityyou.com
Natasha xx
Nicole@Show Off Friday
Those are really cute! Thanks for sharing.
Carissa
so fun, though I'm sure my two year old would constantly try to eat them...I came over from NapTime creations link up, I'm excited to see more of your creations.
Heidi Fowler
Thanks! I'm headed over to visit your site. (My felt food creations have been "tasted" by many!)
Lauren
These are so adorable, and they look so easy! Visiting from Titus 2sDays!
Heather
These are so cute!! Thanks for sharing.
Nichi - The Mandatory Mooch
Adorable. My girls would go crazy for these!! Thanks for linking up to Tasty Thursdays on The Mandatory Mooch. I hope you will link up again this week. The party will be live tonight. http://www.mandatorymooch.blogspot.com
Thanks, Nichi
Jessi @ Practically Functional
Super cute! Thanks for sharing at The Fun In Functional!
Jill
Such cute popsicles! They look absolutely fabulous!
Thanks for linking to a Round Tuit!
Hope you have a fabulous week!
Jill @ Creating my way to Success
http://www.jembellish.blogspot.com/
Christine
Oh WOW!! So cool!! And how sweet of you to offer a free pattern!
Thanks so much for sharing this at The DIY Dreamer.. From Dream To Reality!
Carrie
Thank you for sharing at Sharing Saturday!! I hope you will share with us again this week!
Marcie
In love with these cute popsicles and food! Thanks for sharing on "I Gotta Try That" Hope you entered the giveaway while you were there.
Marcie @ http://www.IGottaTryThat.com
Sharon @ Elizabeth & Co.
Those are so much fun! And zero calories - yay!
emily
hi! Thanks for linking this project to Nap-Time Creations Tasteful Tuesdays. Just wanted to let you know this will be featured at the party this week. Hope you can come by and check it out! Grab a featured button if you dont already have one! This link will go live at 8:30 central time Monday night!
http://www.nap-timecreations.com/2012/09/olympic-party-food-and-tasteful-tuesday.html
ps. would love to see a link to the party on the project post page :o)
K @ Claiming Our Space
So cute! This looks like so much fun! Thanks for sharing on Tout It Tuesday! Hope to see you tomorrow.
Jamie @ Love Bakes Good Cakes
These are so cute! Thank you for sharing it last week at All my Bloggy Friends - I can't wait to see what you link up at this week's All my Bloggy Friends!
angela
New follower from practically functional!! Love your blog:)
Debi @ Adorned From Above
This is so cute. Thank you so much for sharing with Wednesdays Adorned From Above Link Party last week. This weeks Link Party is opened at
http://www.adornedfromabove.com/2012/09/reeses-smore-brownies-and-wednesdays.html
from Wednesday until Sunday.
Hope to see you there.
Debi Bolocofsky
Adorned From Above
http://www.adornedfromabove.com
Randomly Fascinated
Cute!
Thank you for linking up to Friday Fascinations! Don't forget to come back and link up to this week's party! http://domesticrandomness.blogspot.com/2012/09/friday-fascinations-6-everything-linky.html
jan boss
love the felt food! A fun secret- I am posting a blog soon and will link back to you:
Use a cheap foam brush inside the popsicle! gives it some stiffness/body, and the stick will not come out!
Heidi@OneCreativeMommy
What a great idea, Jan! Please let me know when your site is up. I'm excited to check it out.
Jennifer David
Thanks for the easy and short tutorial. I shall definitely dig out my embroidery threads and needles for this one!