• Skip to primary navigation
  • Skip to main content
  • Skip to primary sidebar
  • Skip to footer
onecreativemommy.com
  • DIY/Crafts
    • DIY for the Home
    • DIY for the Garden
    • Crafts for Kids
    • Sewing Projects
    • Felt Food Tutorials
  • Parties/Gifts
    • All Party Ideas
      • Frozen Party
      • Harry Potter Party
      • Spy Party
      • Un-Slumber Party
      • Minion Party Ideas
      • Art Party
      • Princess Party
    • All Gift Ideas
  • Holidays
    • Valentine's Day
    • Halloween
    • Christmas and Winter
    • Thanksgiving and Fall
    • Fourth of July
    • New Year
    • Easter and Spring
    • St. Patrick's Day
    • Mother's Day
    • Father's Day
  • Recipes
    • Gluten Free
  • Tips & Tricks
    • Organization Tips
    • Cleaning Tips
    • Parenting Tips
    • Back to School
    • Cooking Tips
    • Gardening Tips
  • Printables
    • Bingo Games
    • Lunchbox Printables
    • Educational Games
    • LDS Printables and Lesson Ideas
  • Navigation Menu: Social Icons

    • Facebook
    • Instagram
    • Pinterest
    • YouTube
menu icon
go to homepage
search icon
Homepage link
  • Home
  • DIY & Crafts
  • Parties & Gifts
  • Holidays
  • Recipes
  • Tips & Tricks
  • Printables
    • Facebook
    • Instagram
    • Pinterest
    • YouTube
  • ×

    Home » DIY & Crafts » DIY for Kids

    Frosted Princess Cake Tutorial

    Published: Jan 29, 2021 by Heidi Fowler. This post may contain affiliate links 5 Comments

    Important: This post is a follow-up to my fondant skirt princess cake tutorial. In order for this to make sense, please refer to that page. Thanks!

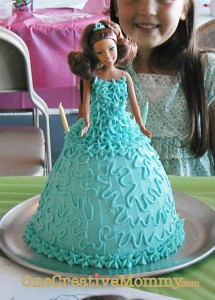
    Frosted Princess Cake Tutorial

    I made this cake several years ago, but I will do my best to remember how I did it (but change the directions so that it will taste good).  Sorry that I won't have step-by-step pictures.

    • If you just want this basic cake -- with no added height from a round cake -- prepare 1 ½ cake mixes and bake in a large glass measuring cup or bowl.  Otherwise, prepare two cakes as I did in my other tutorial.  With either choice, use the angel food cake pan trick to be sure that the cake cooks in the middle instead of turning  into a chocolate rock!

    Following is what I did differently to decorate with frosting instead of fondant.  You can combine both tutorials to find what is easiest for you.

    • Frost the entire cake in tinted butter cream frosting, and smooth it the best you can.
    • Before wrapping the barbie in saran wrap, remove her clothing.  (You will add frosting for the bodice of her dress.)
    • Unless you used a two-cake method, the top of the skirt will be flat, and not quite tall enough for Barbie.  Use frosting to create the top of the skirt.  (Remember, I am not a professional.  I'm just a mom, and moms improvise!)  I just kept squirting with my star tip until the shape looked right (how's that for technical directions?).
    • Use the star tip (or anything you are comfortable with) and pipe frosting to cover the barbie's chest and torso.  You could also pipe on straps with a decorating tip, but I forgot.
    • To hide the frosting lines on the skirt, pipe squiggles all over it and finish the bottom with the same tip you used for the bodice of the dress.

    I like that the height of this cake looks more normal than the other (Barbie's proportions make her legs extra tall--the fake skirt top normalizes it a bit), but the kids were sure amazed with the fondant dress.  (Truth be told--the kids were amazed by this dress, too, though, so do whatever is easiest for you!)

    Heidi

    MORE IDEAS FOR YOU

    • Recipes
    • DIY & Crafts
    • Holidays
    • Parties & Gifts
    • Printables
    • Tips & Tricks

    Reader Interactions

    • Facebook
    • Instagram
    • Pinterest
    • YouTube

    About Heidi

    Hi! I’m Heidi, the sometimes scatterbrained, but always creative mind behind One Creative Mommy. I'm a retired teacher, wife, and mom of three beautiful teenage girls and one adorable fur baby. In my spare time, I love to share my ideas (mistakes and all) with anyone who will listen.

    Learn more about me →

    Comments

    1. Buffi Neal

      June 21, 2012 at 10:46 am

      How cute !
      New follower from the Blog Hop
      -Buffi
      My Wonderfully Dysfunctional Blog

      Reply
    2. Misty

      June 24, 2012 at 1:40 pm

      Wow, you're so busy! Thanks so much for linking up this project to TA-DA TUESDAY as well!

      ~Misty
      413 Sparrow Lane

      Reply
    3. Susie @Bowdabra

      June 29, 2012 at 12:55 pm

      We appreciate you linking up in our Crafty Showcase. Your post was picked as a favorite from our Bowdabra Design Team. Congrats! You will be tweeted, facebooked and pinned today. You are being featured on our blog. Feel free to stop in and get the Feature Friday Badge.

      We LOVED the look on your daughter's face. That is totally priceless. Your tutorial and design is awesome!

      We hope to see you again starting Saturday at midnight for a new round of the Crafty Showcase. Thanks for sharing a part of your blog with us!

      Susie @Bowdabra
      http://bowdabrablog.com/2012/06/29/feature-friday-bowdabra-top-crafty-showcase-picks-3/

      Reply

    Leave a Reply Cancel reply

    Your email address will not be published. Required fields are marked *

    Primary Sidebar

    Hi! I’m Heidi, the sometimes scatterbrained, but always creative mind behind One Creative Mommy. I'm a retired teacher, wife, and mom of three beautiful teenage girls and one adorable fur baby. In my spare time, I love to share my ideas (mistakes and all) with anyone who will listen.

    More about me →

    Subscribe

    Popular

    • Olaf Sock Snowman Tutorial
    • Frozen Olaf Valentines {Free Printable}
    • Make your own storage lockers! {Perfect for kids}
    • 27 Creative Classroom Door Decorations for Valentine's Day

    Save Money

    Footer

    Privacy Policy

    Footer

    ↑ back to top

    About

    • Privacy Policy
    • Printables Terms of Use

    Newsletter

    • Sign Up! for emails and updates

    Contact

    • Contact

    As an Amazon Associate I earn from qualifying purchases.

    Copyright © 2022 OneCreativeMommy

    »
    «