I make a lot of things for my kids. Sometimes they're a hit, and sometimes they look really nice while they collect dust. This project? Definitely a hit! These pencil rolls are well loved and well used. I hope your family enjoys them, too.
My original plan for these pencil rolls was very simple—based on this tutorial. (If you want super simple and quick, go for that tutorial.) But, as I was searching for directions, I ran across a tutorial on this site, and I couldn’t resist! (*Her post was removed. I think she must have started selling her designs.) I really loved the raised pockets and button closure. The only problem—this one was way too complicated and advanced for my skill level and short time schedule. So, I combined the two ideas.
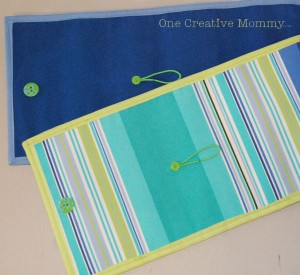
The fancy tutorial requires 3 fabrics and 2 types of interfacing. I replaced all of that with a placemat. The placemat must be the style with two layers sewn together. (If your placemat is the same on both sides, you only need one. If the placemat has two different fabrics, you will need two.) I will give directions as if you are using two placemats.
You will need:
- 1 placemat (or two, if the placemat is different on each side)
- Matching thread
- 1 package extra wide double fold bias tape (optional)
- 2 buttons, 1 large and one small
- 1 skinny elastic hair tie
- 1 24-pack colored pencils
Step 1—Find a cute placemat. I searched for the widest ones possible, because I wanted 26 slots. (I bought a pack of four placemats on sale for about $5. I haven't found them that cheap since, but maybe you'll get lucky!) Lay the placemat out with the side you want inside the pencil roll facing up. Lay a colored pencil on the mat about an inch below the top and fold the bottom of the placemat up and over the pencil. The part I folded up turned out to be about 4 ½ inches tall. Mark it and cut off the part you folded up. Set aside the large piece of placemat. Do the same thing with a second placemat--making the cut off piece the same size as the first one.
Step 2--Using a seam ripper, take out the stitching on the short pieces you cut off the placemats. You should now have four separate pieces of fabric about 4 ½ inches tall.
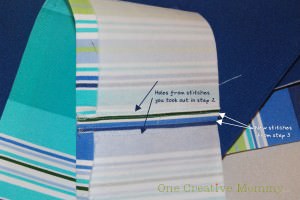
Step 3—Lay the two matching pieces on top of each other with the right sides facing in. (Make sure to match the long edges – unfinished edges both at the bottom.) Carefully unfold the finished edges at the right and refold down the top. Pin the right edges together and stitch a new seam to attach the strips together. (I found it easiest to stitch down the old fold.)
Now lay the long strip out flat with the wrong side facing up. Press open the seam and stitch it open by stitching down each side of the seam.
After sewing strips together, stitch across the top seam to hold down the part that was folded under when the two sides were together. (Hopefully, you’re better than I am at sewing a straight line!) To reduce bulk, keep the outside edges unfolded when you sew down the top.
*** Please forgive me. When I started this tutorial, I forgot to take pictures of the process of making the pockets. When I went back to take pictures, I was working on a pencil roll with a solid back and patterned pockets--the opposite of my original pictures. I hope you aren't too confused. The pictures of the next few steps will have the fabrics reversed from the fabrics in my original pictures. Again, I apologize! ***
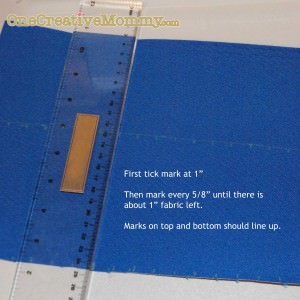
Step 4--Now for the pockets! Use a seam ripper to separate the front and back of the main body piece. Place one of the main body pieces (the piece that is different from the pocket piece) face up, with the cut edge on the bottom. Using a water soluble marker or pen, draw a line across the length at about 4 ½" (the same height as you pocket piece). Starting at the left edge, make a tick mark 1" from the edge, crossing the line you drew and going up. (You want to be able to see the tick mark above the pocket piece.) (My pictures show the line higher with the tick marks under the line. You will have less to erase if you do it the other way. Sorry the pics don't match the directions. I learned as I went!) Now mark tick marks across your fabric every ⅝". When you get close to the right edge, try to leave as close to an inch as possible from your last tick mark to the right edge. Make identical marks on the bottom edge of the fabric. (The top and bottom tick marks should line up.)
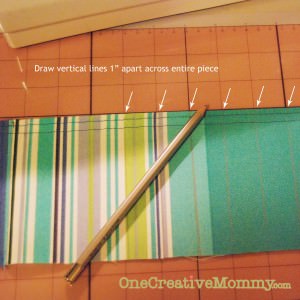
Step 5-- Mark your pocket piece. If you plan to use bias tape at the end, start marking right from the left edge. If you don't want to use bias tape, fold a little bit under to create a finished edge. Using your water soluble marker or pencil, draw a vertical line every inch across the fabric.
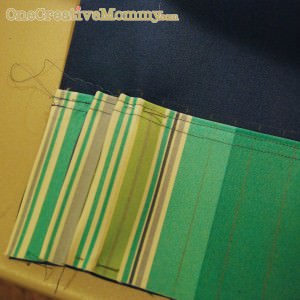
Step 6--Line up the left and bottom edges of your pocket and backing piece and pin the left edge in place. The first vertical line on the pocket piece should line up with the first tick marks on the backing piece. Sew down that line. Now pull the fabric toward the left until the next vertical line matches up with the second set of tick marks. Pin the fabric in place and stitch down the line. Continue in the same manner until you reach the last pocket. (I must admit that pinning each pocket is quite a pain. After sewing the first few pockets, you will probably figure out that you can hold the fabric in place with your fingers instead of pinning. It worked for me.)
If you are using bias tape, trim the right pocket edge even with the backing piece. If you are not using bias tape, leave ¼-1/2" extra fabric to fold under for a finished looking edge.
Step 7--After you sew the pockets, pin the front and back body pieces back together and stitch around the edges (close to the edge so that you can cover it up with the binding).
*If you choose not to use binding, you can finish the bottom edge to match the rest of the placemat and be done. Before sewing the placemat back together, carefully fold the bottom of the pockets and the back of the placemat in towards the inside of the placemat, pin it, and stitch it up. (You will be stitching through many layers of thick fabric. You should set the tension on your sewing machine to zero.) Doing it this way will give your pencil roll a really clean look. If you do it this way, skip step 8.
Step 8—Sew bias tape around the outside edges. (I was not very good at this step! If you use the tape carefully, you should have almost exactly enough to go around two pencil rolls.)
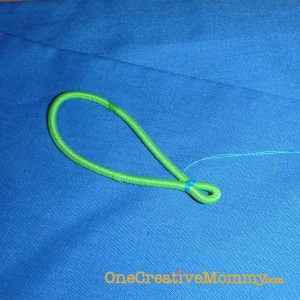
Step 9—Pinch the hair tie so that one end is just large enough to stretch over your small button. Wrap thread around the area you pinched, and tie it off. Set aside. (I used blue thread so that you could see it. I would normally use matching thread.)
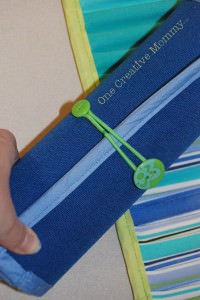
Step 10--Fill your roll with pencils and lay it out in front of you. Starting from the left side, roll it up. Mark a spot 1 ½ -2 inches to the left of the edge of the pencil roll. Stitch on your small button. (You may have to remove a pencil or two while you stitch.) Slip the tiny loop over the button and re-roll the pencil roll. Pull the elastic across the roll to the right, and mark a spot for your large button. Make it far enough away that the elastic will have to stretch in order to go over the button. Sew on the button. YOU'RE DONE!
Now, add a coloring book and you have a great gift! So far, this has been my girls’ most-used Christmas present. I hope it makes a great gift for you, too. I want you to know that I worked really hard to make all the mistakes possible so that you don’t have to make them too! (I think I had to unstitch my first roll at least twice!) Enjoy!
Thanks for stopping by!





Jennette
I can't wait to try this! Thanks for the great tutorial!
Crafty Cousins
How fun! I love the colors. I'd love for you to link it up to Crafty Cousins. http://crafting-cousins.blogspot.com/2012/05/what-i-wore-sunday-week-16.html
~Natalie
Kadie
Thanks for the great tutorial!! I love these type of crayon rolls. Hopefully I will be able to make some for my kids.:) Thanks for sharing with us at Link It Up Thursday.
bague bulgari occasion faux
She grabbed Spencer’s hand and held it to her chest.
bague bulgari occasion faux http://www.aluxury.nl/fr/