

The 12 Days of Christmas: Day 3
Today, I'm excited to share my blog with Danielle from Poor and Gluten-Free. Not only does she share gluten-free, allergy-friendly recipes, but she also shares lots of tips (like the one she's sharing today) about living frugally and protecting the environment by cutting down on waste. Today she's sharing her easy, classy, drawstring bag tutorial for Christmas (I love the fabric!). Here she is!

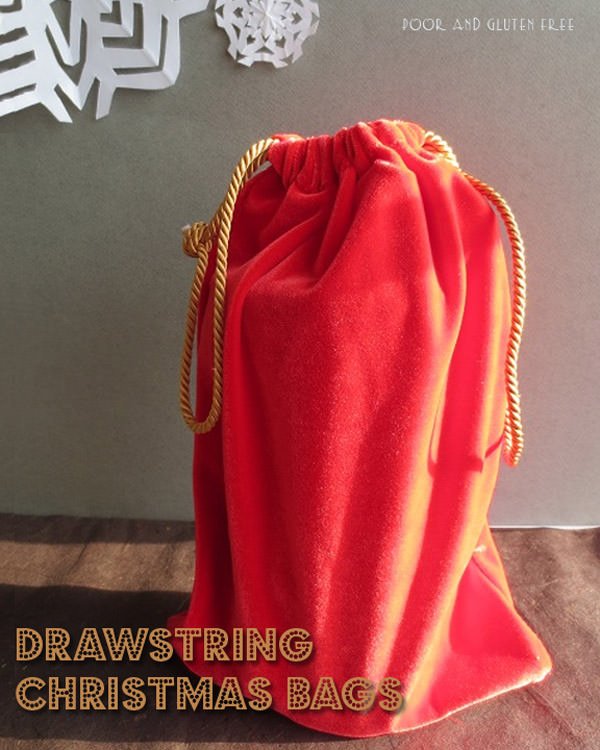
Easy, Classy, Drawstring Christmas Bags
Hi everyone! I'm so thrilled to be guest posting this week on Heidi's fantastic blog as part of the 12 Days of Christmas along with so many other great bloggers. This week I'm going to share a tutorial for making simple drawstring Christmas gift bags. They're very easy, eco-friendly, and cheaper AND classier than your average dollar store gift bag!
So first, a little about me: over at Poor and Gluten Free. I blog about living sustainably on a budget and being gluten intolerant. I also share about oral allergy syndrome, which causes my allergies to most fresh fruits, veggies, and nuts. On my blog, I share healthy, allergy free recipes, DIY tutorials, articles, reviews and other random things that take my fancy.
I don't know about you, but the commercialization of Christmas drives me crazy. Not only does it seem antithetical to the reason most people celebrate it, but Christmas consumerism creates a ridiculous amount of bad environmental waste in the form of uneaten leftover food, wrapping paper, unwanted gifts, ugly knickknacks, old decorations and so on and so forth.
So this year on top of trying to find eco-friendly gifts, I'm making gift bags that can be reused for years to come. In fact, these beautiful bags can even be a part of the gift! They can be re-gifted, or used for storing things or even as little purses. The bags are simple to make with a sewing machine, and the felt bag is easy enough to make even without a sewing machine. So far I've made drawstring bags (shown here) felt bags, and reversible drawstring bags, so check back on my blog later this week and next for more gift bag tutorials!

Drawstring Gift Bags
My grandmother made these drawstring bags for my sister and me when we were kids to hold things like Legos and Smurfs, and she hung them on hooks from the drawstring. She used old stockings instead of ribbon or braid to tie them up! My mum recently made one to hold my laundry dryer balls, so these are truly a cross-generational thing! I've used some leftover velvet for these demo bags, but you can use pretty Christmas fabric, old bed sheets or t-shirts, or anything else you like. Although a bit more work, I think these bags are even more durable than the felt bags, and the fabric possibilities are endless.

What You'll Need
- Two pieces of fabric, cut to any size rectangle you like. For these, I cut 10x16"
- Ribbon, approx. 38" long
- Thread
- Sewing machine

Directions
- Pin along bottom and sides, leaving 2 ¼" at the top open.
- Sew along the sides and bottom with a ⅝" margin, leaving the 2 ¼" at the top open. In this case, I used a zigzag stitch because my fabric was stretchy. If using non-stretch fabric you can just straight stitch.
- If your fabric is of a type that unravels easily, pink your edges using pinking shears, this also gives it a nicer finish on the inside. (Otherwise, if you want a real pro look you could serge all your edges before sewing up the sides and bottom).
- Press your sides and bottom open, making sure that you also press down the edges at the open top.
- To make a casing for your cord or ribbon: on each side of the bag, fold the top down ¾" and press.
- Fold down ¾" again. The folded edge should come just a little below the side stitching. This is to help secure the side stitching and prevent it from coming undone over time and under the pressure of being opened and closed continuously.
- Pin your folded edge down, especially where the two corners of the casing meet to prevent slippage.
- Sew all along the bottom edge of the fold (again, I used a zigzag stitch for my stretchy fabric).
- Clip the bottom corners of the stitching to reduce bulk in the corners. You can turn your bag right side out now.
- Measure enough cord or ribbon to wrap around your bag 4 times, with about 4" extra for tying the ends. (i.e. my finished bag was about 17" wide so I needed approx. 38" of cord).
- Attach a safety pin to one end of the cord or ribbon and thread it through the top casing of the bag, run it all the way through both sides. Now, you can stop here if you like, and have a simple drawstring bag with a pretty cord hanging off one side only. That is perfectly fine and you can use less cord that way, too.
- If you want a pretty cord hanging off both sides of the bag, then run the cord through a second time. For the second loop, leave some excess hanging out of the open side so you don't confuse it with the first loop.
- Cut your loop in half (hint, wrapping a little piece of tape around the cord and cutting through the middle of it will prevent it from unraveling). Tie your ends together on both sides and voila! A simple drawstring bag that takes no time at all to make, but saves oh so much Christmas waste!
Thanks so much to Heidi for the opportunity to share this tutorial with you all here on One Creative Mommy. I hope you enjoy them, and who knows, if you give one of these bags to someone, maybe one day their children and grandchildren will be making them too! I also hope that you'll stop by my site and check out some of my other tutorials, including some more Christmas gift bags!
Will you be doing something eco-friendly this Christmas?
Thanks so much, Danielle. I know I'm excited to make some bags. Just think of all the wrapping time it will save! I'm excited for a less-hectic Christmas Eve! Be sure to stop by Danielle's blog and check out some of her great ideas. Here's one of my favorites: How to Make Coasters from Scrap Fabric


Danielle @ Poor and Gluten Free
Thanks so much for hosting the 12 Days of Christmas, Heidi, and letting me share this tutorial :)
Heidi Fowler
You're welcome, Danielle! I'm so glad to have you posting today.
I Gotta Try That
These bags are adorable Danielle! Great tutorial.
Marcie
Julie Moore
Those are really cute, Danielle!