


Does this sound familiar? You had a dream to start a blog. Not just any blog, but a blog where people would love to visit. You'd get tons of visitors a day, and they'd leave encouraging comments and laugh at your witty humor and fun posts. You'd share the things you love and help others in the process.
So, you did it. You started your blog. You gave it a catchy title, and you poured your heart and soul (and tons of time that your really didn't have to spare) into every post. You stayed up late, you neglected housework, you fed your family fast food (a lot), but your dream just didn't seem to work out. You built it, but nobody came. (Did you catch that Field of Dreams reference?)
How do I know about your failed dream? Easy. It was mine, too.
Don't give up yet! This month I'll be sharing some ideas to build your blog. Today my focus is on improving photos for your posts by using a light box. Before I started using a lightbox, my visitors were mostly my friends and family. Even though I linked up to tons of parties each week, I rarely got featured or pinned. My first post using a light box was featured 9 times!
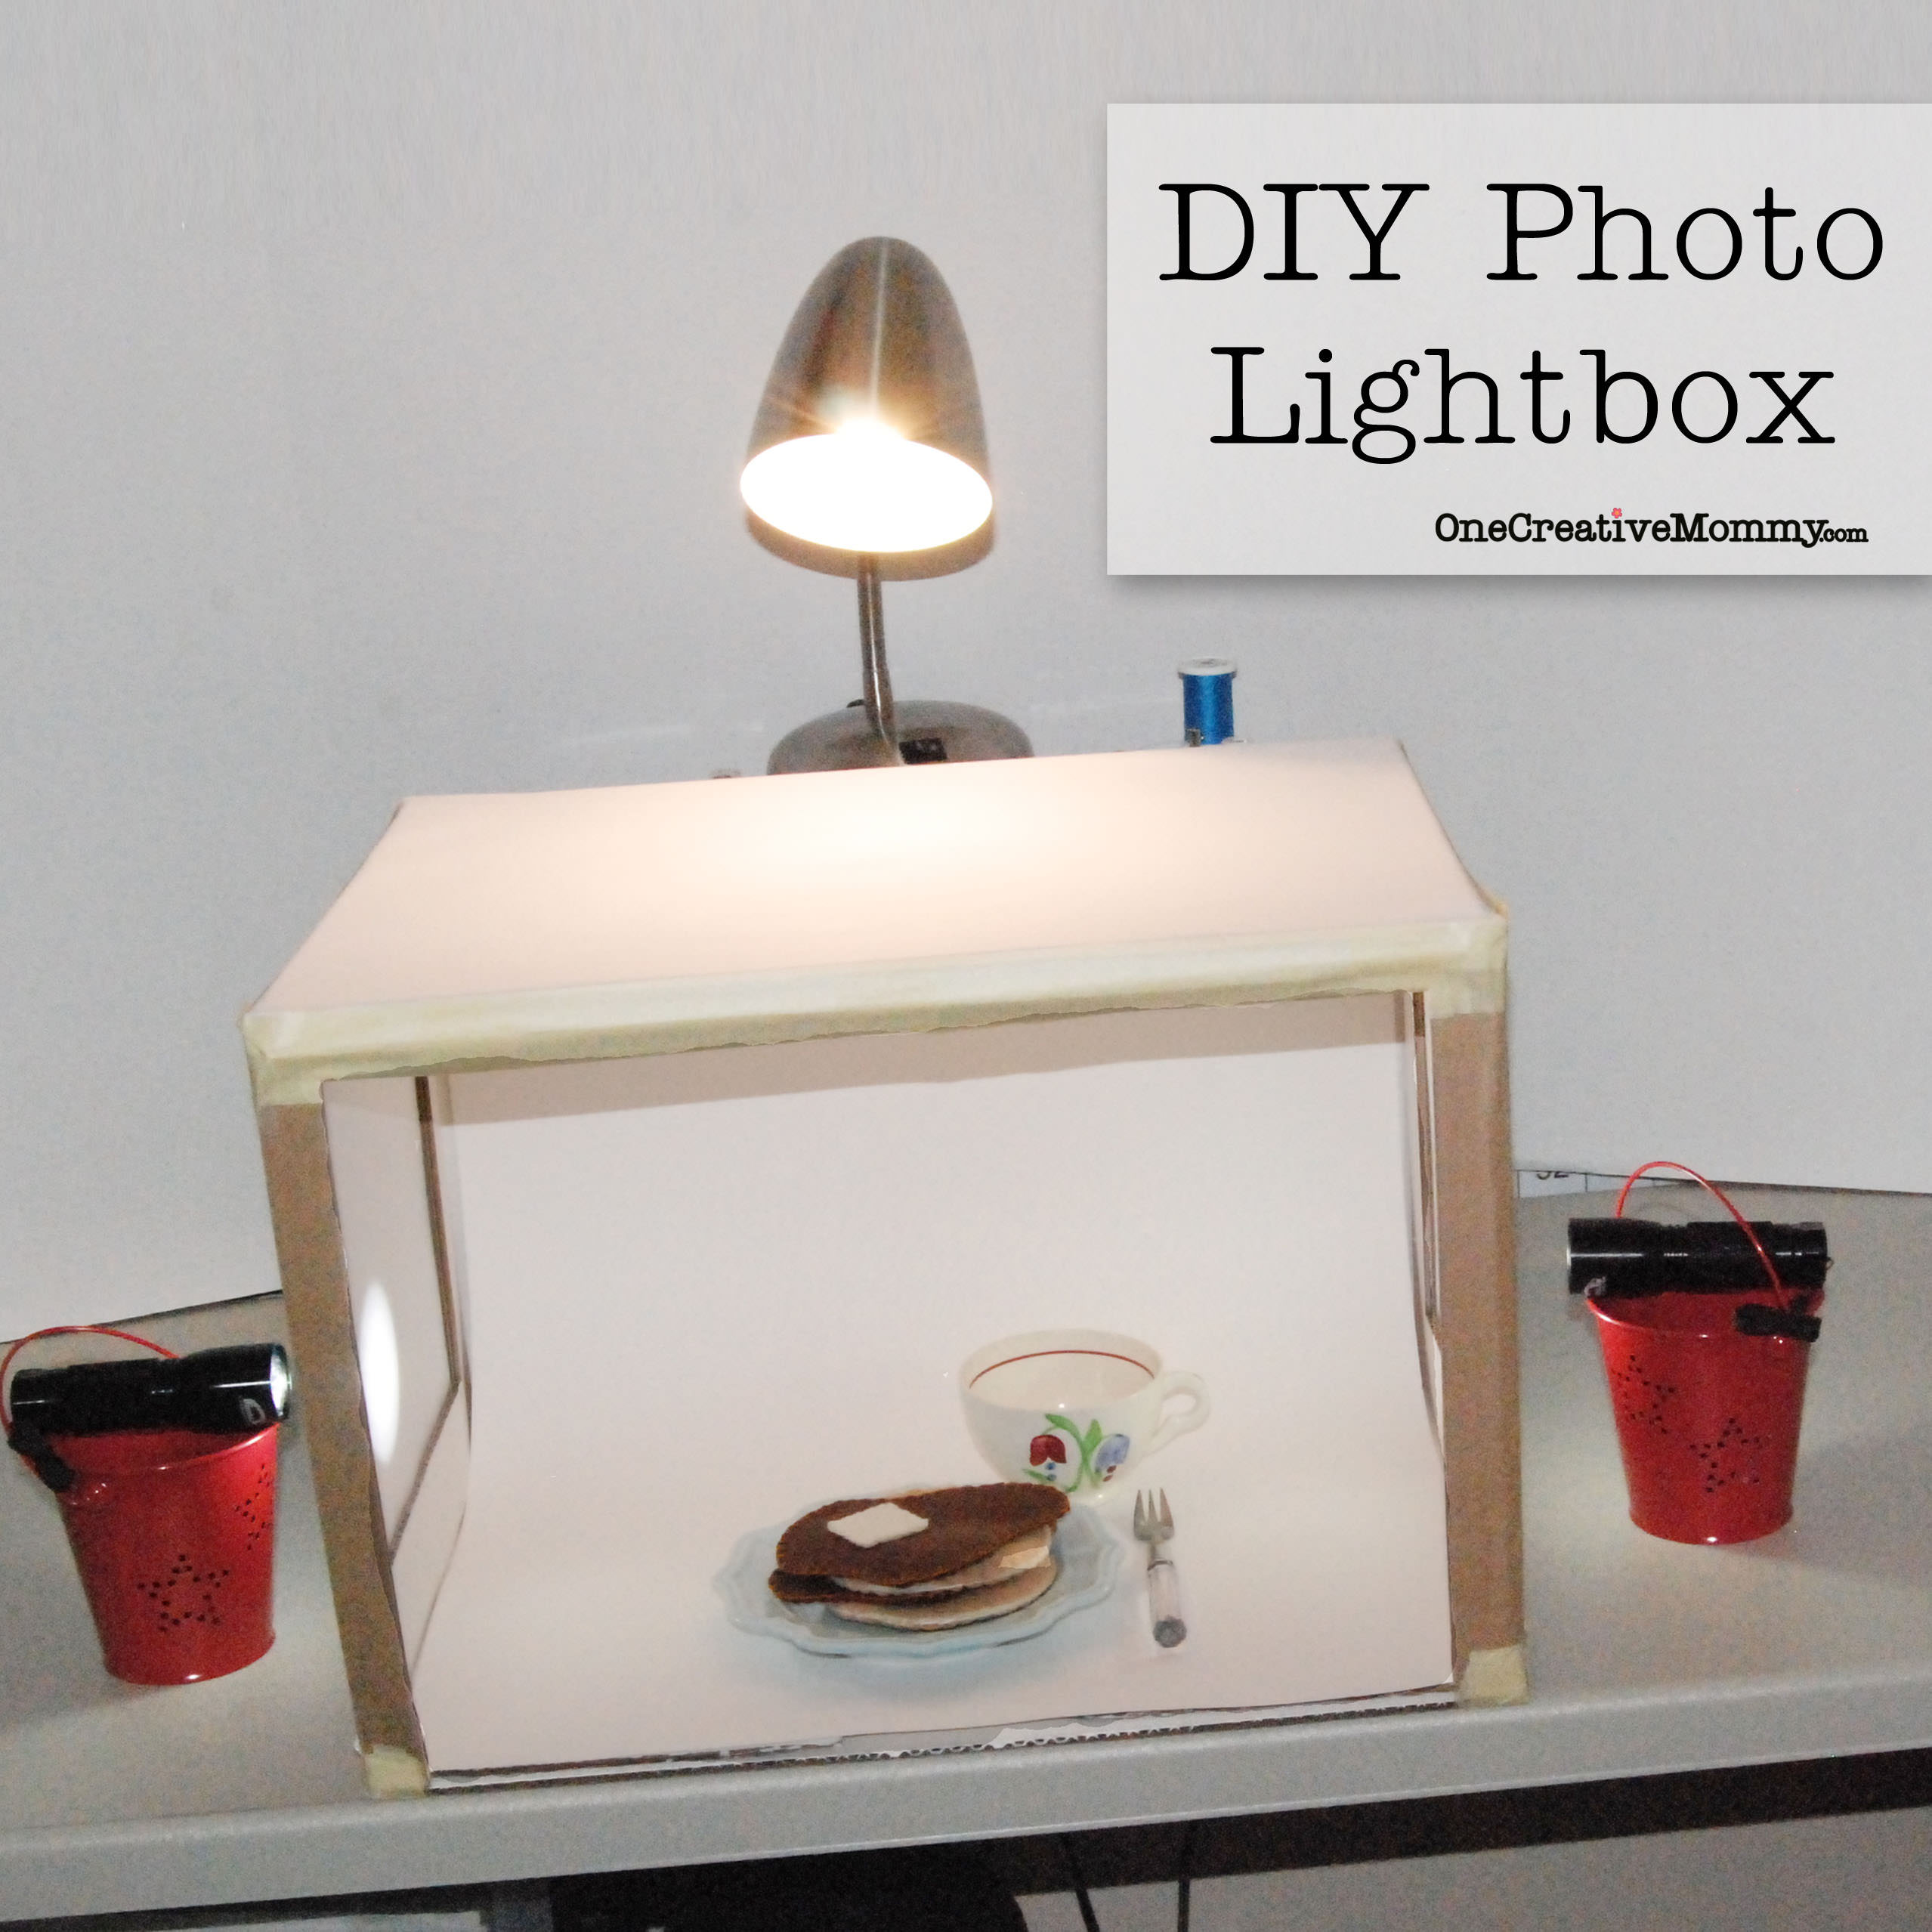
Think about it. When you are browsing pinterest, facebook, emails from websites (or whatever source you use to find ideas), what is it that makes you want to click on a link and visit someone's site? Is it a catchy title? Is it their opening line? Most likely, it's the photograph. Now, think about your site. If you took away your text and title, would someone visit your site because of your picture? If not, this tutorial is for you!
DIY Photo Lightbox
The key to good photos is good lighting. Ideally, pictures should be taken outside in indirect sunlight (at a sunny time of day, but in the shade). Natural lighting is the best. I don't know about you, but I rarely get to work on projects during the day. Most of my work is done when it's already dark outside.
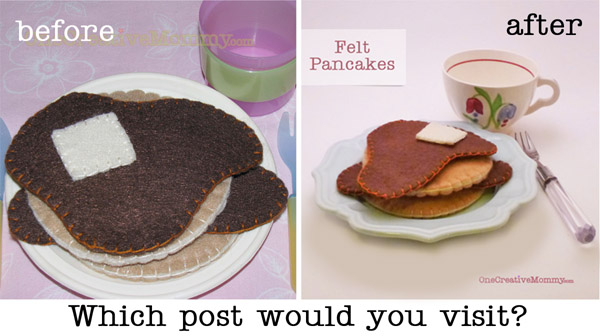
The first photo was taken in the house, at night, without a lightbox. The second was taken in the house, at night, with a lightbox. Which post would you visit?
Want to know how to make your own lightbox? It's surprisingly easy.
You will need:
- A large cardboard box
- White paint or paper
- Masking tape
- *White muslin fabric (Blythe suggested in the comments that tracing paper will also work instead of muslin. Thanks, Blythe!)
- A box cutter
- Metal ruler (You can use wood or plastic, but metal works best with the box cutter.)
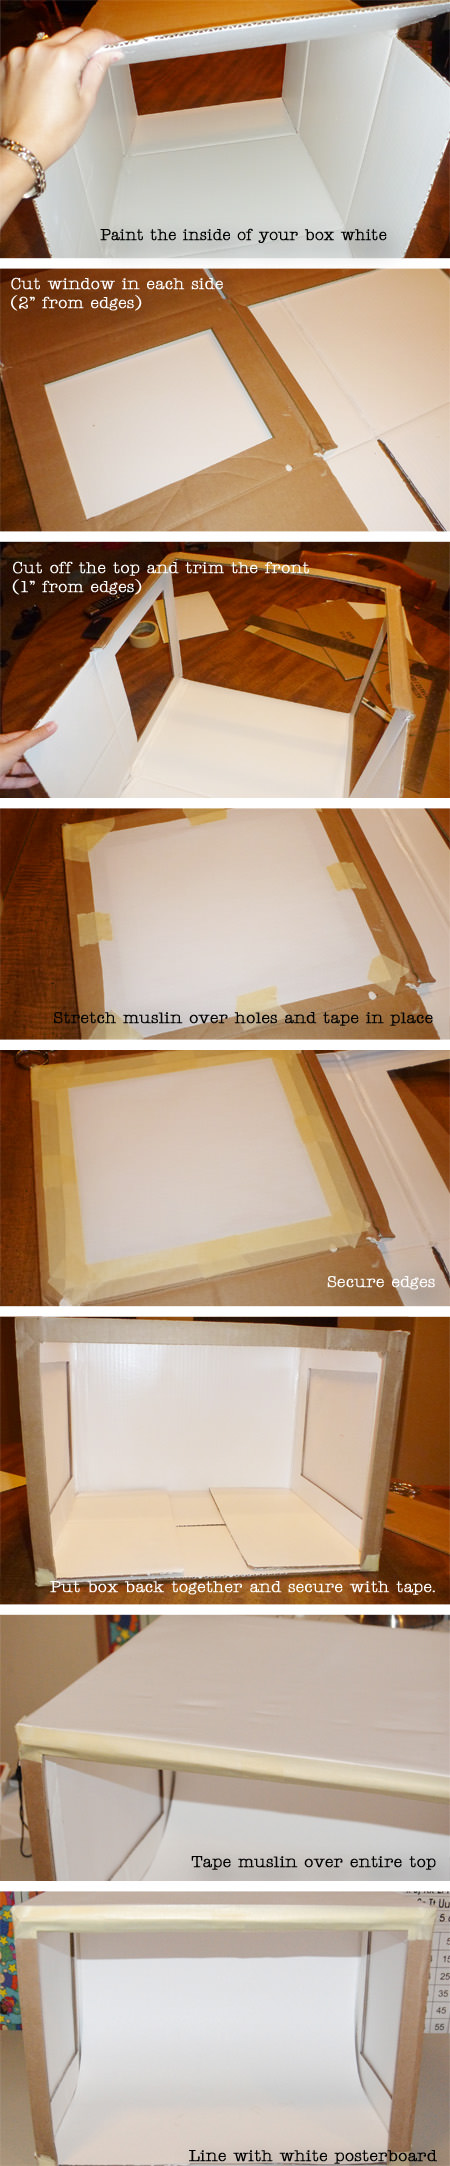
Need more details than the photo provides? Here you go:
- Select a box large enough to hold the majority of your projects, and paint the inside white. (You could line it with bright white paper instead)
- Cut windows in the right and left sides of the box--leaving a two-inch border all the way around.
- Cut the top flaps off completely. (Do not remove the bottom flaps.) Cut a window in the front of the box--leaving a one-inch border on the sides and top.
- Stretch muslin over side windows and tape in place. (To stretch it tightly, tape opposite edges and corners first.)
- Tape all the way around the muslin so that there are no holes.
- Put your box back together and secure with tape. (Fold the bottom flaps back together to make it sturdy.)
- Tape muslin over the entire top of the box.
- Cut white poster board to the width of your box and slide it in from the front. Trim the bottom so that it fits in the box. (The poster board can easily be replaced as it gets dirty. I tend to spill on mine when I photograph food!)
You're done! Now you just need lighting.
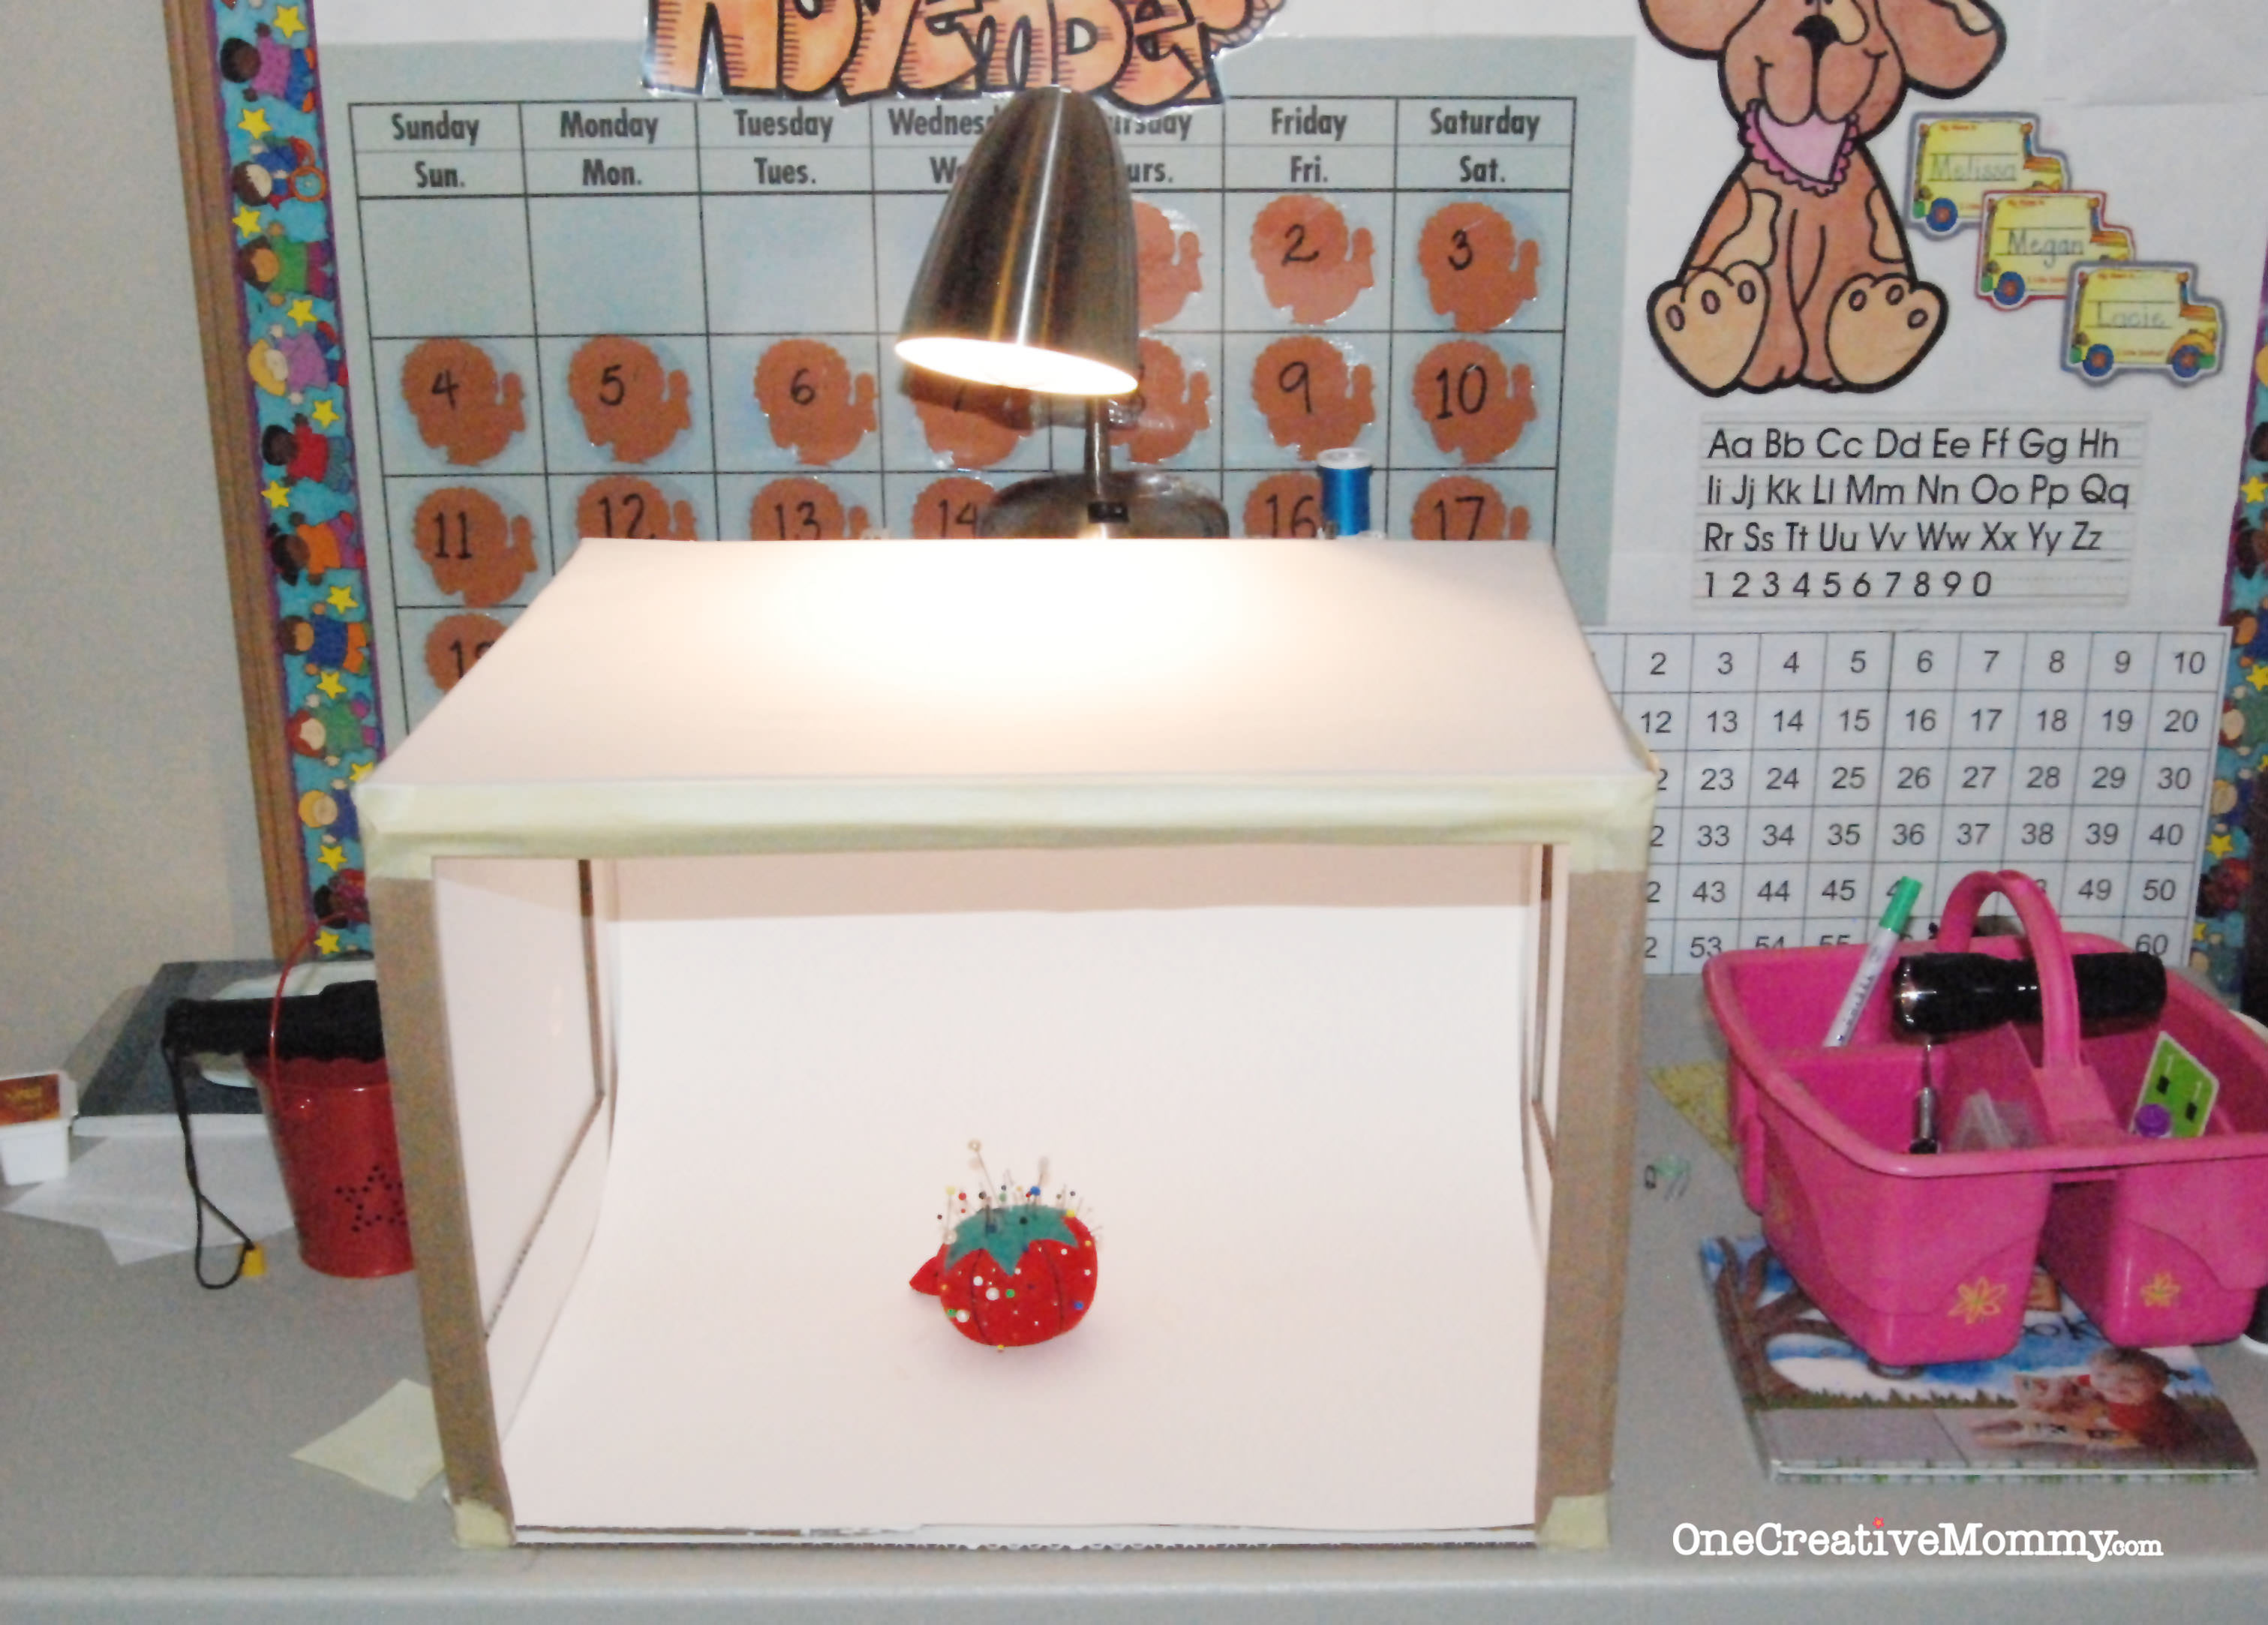
Go ahead and laugh, but this is how mine is set up. That lamp is sitting on top of my sewing machine, and those are really bright flashlights propped up on buckets to light the sides. I would love to have three lamps, but flashlights are much less expensive! (These are super bright ones from Costco.) I covered up my calendar and cleaned off the desk a bit for the other picture. This picture is reality. To take a well-lighted picture in a lightbox, your house doesn't have to be clean, and it doesn't matter what kind of clutter surrounds the box (as long as it doesn't cast shadows on the box)!
Just a couple more tips:
- For natural light, you should use a full-spectrum light bulb. I use GE Reveal 60 Crystal Clear Color Enhance Full-Spectrum bulbs.
- When taking photos in a lightbox, turn off the flash on your camera.
Want to see the difference with and without a flash? It's kind of amazing, don't you think?
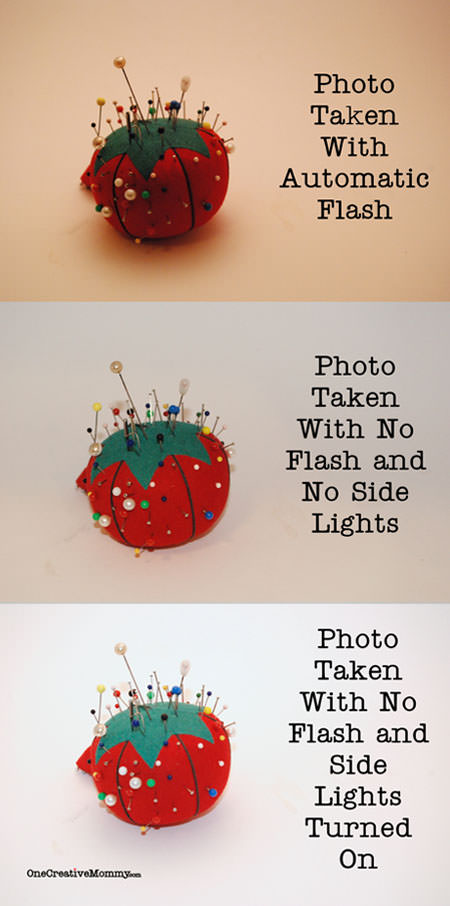
(See the food stains on my cardboard? Time to replace it!)
I hope this tutorial is helpful. I'd be interested to know if it worked for you. Special thanks to HowtoWired.com and NinthandBird.com. I combined their ideas to make my own!
*Disclaimer: I need better lights. I would love to have a large, rectangular light for the top and more for the sides. Because my lights aren't perfect, I do sometimes have to lighten my pics in photoshop. To see better light fixture options, check out the links above.










Brenna
So excited for this series! Those first few paragraphs I thought you were directly talking to me.
Heidi Fowler
Isn't it nice to know you aren't the only frustrated with getting your site started? We all have to start somewhere, right?
Heather @French Press
what a great tutorial
Nici ~Posed Perfection
Oh, my goodness! Great tip. I am pinning this to my Blog tips board. Thanks so much for sharing!
Blessings,
Nici
Heidi Fowler
Thanks, Nici!
Dee @ deeconstructed.com
Hey, a tip within a tip...a blog pin board. Genius! ~ Dee @deeconstructed.com
Stephanie @ It's not just about the recipe . . . .
It's like you were reading my mind, Heidi! Thanks for the wonderful tip. I can't wait to make my own photo lightbox. Here's to better pictures!!
Heidi Fowler
I hope it works for you! I need to get better lights so that I don't have to edit at all. I still have to adjust the lighting sometimes, but adjusting with a white background is pretty easy. Good luck!
Dee @ deeconstructed.com
Love it, love it, love it. Now to figure out how to build one big enough to fit dressers & chairs in it. I think I need to revamp a closet into a light box! Thanks for the post & series - can't wait for more tips & tricks. ~ Dee @deeconstructed.com
Heidi Fowler
Thanks, Dee! I think the closet idea sounds great! Wish it were possible. I saw an inexpensive camera attachment that should help with things that don't fit in a lightbox and can't be taken outside. I'm crossing my fingers that the site will let me test it and give one away to a reader!
Bethany
Thank you! I've needed this. I have got to make a light box. :D
Heidi Fowler
I hope it works for you! It sure has been helpful for me.
Blythe - Desperate Craftwives
I made a similar lightbox several months back and it does make a HUGE difference! I used tracing paper instead of Muslin and that works great too. Great tutorial!
Blythe
Jo and Sue
Thank you for sharing this awesome tutorial! I definitely need to do this :)
Elaine @ Cooking to Perfection
Awesome tutorial!! This is going to be so helpful because I rarely am able to take my pictures in natural daylight. My photography is definitely the one aspect of blogging that I need to improve, so I'm going to start by making this lightbox. :)
Raquel @ Organized Island
I love this box idea Heidi! Thanks for the step by step process! :)
Linda
I am for sure going to make one of these! I love this Heidi!
Diana Rambles
Great job! I made one a little different but I am still figuring it all out!
Liz
What a great, creative idea. You are right about the pictures. I click on links where the picture tells me what I'm going to get. Of course, I also like to see what they say the post is about too. Sometimes that is what lures me, but a good picture is a must. Look forward to your other blog wisdom.
Liz
Heidi Fowler
Thanks, Liz. I find that I still have to do a little editing here and there, but the result is so much better than without the lightbox! I particularly like that I don't have to clean up my house to take the picture!
Parrish
This has to be the best thing ever!!! I always cook dinner late and its always dark so my pictures of food suck unless I take pictures of leftovers the next day and that doesnt always work but this is genius, I cannot wait to make this!!!!
Heidi Fowler
You're going to love it! When dinner is ready, I dish up a fancy plate and set it aside while we bless the food and get dinner started. Then I race upstairs, pop the plate in the lightbox, take some pics, and join everyone else for dinner. (The kids always argue over who gets to eat off of the fancy plate!)
Parrish
Im so excited annnnd I just so happen to be going by Costco Saturday so I can pick up some flashlights!!!
Kathy Moody
I can't wait to read more of this series! This is on my to-do list this weekend. Thank you so much for the info and the great tutorial! It's amazing what a difference the box makes. :)
Hilda @ From Overwhelmed To Organized
This is a fantastic tip Heidi! I've been trying to find simple ways to take better pictures because my home has very poor lighting at the best of times, and, like you, I do a lot of my blogging in the evening. I spend too much time editing photos so this will be a great time saver. It won't work for all my pictures since a lot of times I'm taking pictures of organized spaces in my house, but it will help with enough to make it worth doing! I'm looking forward to the rest of the series!
Bonnie @ the pin junkie
Thanks! Great tutorial! I pinned it!
Anna-Leigh
This is awesome! I really need to make on of these. Sometimes the light in my house is just not idea, and it's too cold to go outside and find the light. I just might have to build one of these ;-)
Mindi
This is just awesome, too bad most of my projects are too big to fit in a box, but I think building one is worth it for small projects! Pinning!
Penny
Really great tutorial! Thanks so much!
Brooke
Thanks for the great tip! I'm in the first stages of blogging, so I need all the pointers I can get. I'm sure grateful for people like you who will share so much! Thanks again! Have a great day!
Cassidy @ Cooking Gluten (& Dairy) Free
Thank you thank you!!! I work 4EVER on my pictures and they're just not that good. Really looking forward to your series!
Carrie
Super easy and so well described - Thanks!
I definitely need this ... just a little bit bigger and maybe collapsible, or wall mounted or something!
Thanks again!
Jessi @ Practically Functional
Awesome! Taking better photos is definitely one of my goals for my blog this year, so this will help!
Jessi @ Practically Functional
I just wanted to let you know I featured this today on my blog! You can check it out and grab a Featured button here: The Fun In Functional link party
stephanie
Excellent post! I can't wait to make mine. Thanks SO much for sharing
Steph
swtboutique.com
Lisa
I need this tutorial so bad!! Thank you!!
Kelly - Two Kids Cooking & More
This is a great tutorial. I recently made on for our photos too, but it's bigger and I have to get some backgrounds I can use in it. It really does help tons with photos...especially when you have to shoot after dark.
Thanks for stopping by and sharing it at our Sunday Show and Tell!
Crystelle Boutique
Oh my! I had no idea it made THAT big a difference to have the side lights!
WOW! Thanks so much for sharing this easy to make box.
hugs x
Crystelle
(what food stains...??)
Dani H
I haven't added recipes to my blog in the almost three years since I started it because I couldn't get good pictures ~ I was thinking it was the camera but you've proven the lighting can be more important! This is fabulous! Thank you!
{I came here through "Let's Get Linky" at 'BunsInMyOven'}
Chandra@The Plaid and Paisley Kitchen
Thanks for linking up at Show Me Your Plaid Monday's! Guess what my Hubby is doing this weekend?! Thanks so much for sharing!
Danielle @ Poor and Gluten Free
Wish I had seen this a week or two ago! I've been visiting my family in Vancouver, BC over the holidays and it has rained every day for the last month. Every. Single. Day. (except 2 half days) So gloomy and dark for photos!!
Thanks for sharing this on Waste Not Want Not Wednesday, Heidi!!
Evelyn @ My Turn for us
I just pinned this!! I have been trying to come up with something, easy that would help my pictures. I am making this!!
Have you shared this at Freedom Fridays and I missed it? If you have could you share it again and if not could you share it:) I just hopped in and found it, thank goodness because now I am excited about making one:) I will let you know:)
Have a great day:)
http://www.myturnforus.com/
Barbara
Found you in Practically Functional's weekly link party. Great tutorial. Gonna pin this too
Millie
This is great! I found you on the rustic pig right as I was posting a not so flattering picture of a dish I made. This is a must do for me!
Lori Who Needs A Cape?
I am so pinning this and giving my husband a to-do project! Thank you!
Lori
Whoneedsacape.com
We're Not Your Average Super Moms!
Dani from Who Needs a Cape
So happy I found this on your link up to Two Cup Tuesday. This is a wonderful tutorial!! Thanks for sharing!
Monica
Thank you for this great tutorial! I'm always taking pictures at night, and it takes a lot of photoshop adjustments to make the light look okay. This will be so helpful!
http://www./
As Charlie Sheen says, this article is "WINNING!"
Vanessa
This is great! I'm definitely going to make one. I've got a huge window in my kitchen and when it's bright out I usually take pictures, but if it's a raining or gloomy day, I'm out of luck. The lighting in my apartment is horrible so this might come in handy.
Chrissy
I love this tip! looks easy to make too!! I am hosting a new Pinterest Power party and would love for you to link up this and any other projects that you have!!
http://www.thetaylor-house.com/2013/01/10/pinterest-power-party-1.html
Chrissy
Daniela @frugal ain't cheap
Brilliant! I am pinning this!! thanks
Jane
I love this! I can't wait to do this myself.
Kelly @ Corner of Main
Awesome!! Thanks so much for sharing. I never thought of doing this, but I remember using one of these in photography class many years ago. I can't wait to try it out!
Heather @loveandcents
You seriously made my day! I am going to try this! I have such a hard time with lighting on my photos! I am going to pin it now http://www.pinterest.com/hbrummett . Thanks so much for linking up at our pin party! Come back next Thursday! ~Heather
wildcraft diva
Fantastic! Now where can I find a box? Pinned this.
Lisa @ A Little Slice of Life
Thanks for the tutorial. I really need to do this so I don't have to only take pics during the day.
Betsy @ Anna Nimmity
What a great tutorial! Can't wait to try this.
Vicky @ Mess For Less
I love you for this, my husband won't so much since I am going to have him make this for me. :-) Just pinned. Thanks so much!
Mackenzie
This looks great! You are a featured favorite this week on Saturday Show & Tell at Cheerios and Lattes! Thanks so much for sharing last week, we can't wait to see what you've been up to this week!
Have a great weekend,
Mackenzie :)
Bethany
Thank you for sharing this! I'm in desperate need for a light box. Going to pin this so I can remember when I'm ready to construct one.
Charlene@A Pinch of Joy
You are featured this week on Busy Monday! Hope you will stop by and snag a Featured button from the button box. Thanks so much for linking on Busy Monday!
Katie @ Simply Clean Living
Thanks for the tutorial! I live in Alaska and it's so hard to get good light all winter! Hopefully this will help!
Jamie
WOW! The difference is huge! I need one. badly! Thanks for linking up to Monday Funday!
Ivan
Great and simple way to explain. thank you
Terry
Great idea! Huge difference in the photos.
Sera
I've been looking for a light-box DIY for so long! I actually stumbled across this as I was referencing your site (for the 90th time) for some inspiration for my own. I wanted to check out how you present your home page, when this article jumped out at me (I make little DIY crafts too so the light box is perfect - and cheap!!)
Thanks so much for showing how to do this - I will definitely be using this tutorial soon!
Cheers!
Tracy @ Cotton Pickin Cute
Hi Heidi. I'm new to your blog and I'm now following you on google+. This is so great and I've pinned it. Now I just have to make it and put your tips into action. Thanks for sharing it with us. I'm looking forward to reading your past post and new ones.
Hugs… Tracy@CottonPickinCute
cpcblogging(at)hotmail(dot)com
P.S. I'd love you to stop by and visit my blog sometime too!
Evelyn @ My Turn for us
I just sprinkled this post at all my favorite places, Facebook, Twitter and Pinterest!!
Thank you for sharing at Freedom Fridays Blog Hop and thank you for being one of my Five Faves!!
Have an totally awesome day:)
Lizy
Wow..I can hear the angels singing hallelujah on my side of the screen! I just started blogging 2 months ago and this post is gold in words! I can't build a Lego house even if I wanted to, but my husband is gifted with his hands and he will be working on this for me this weekend. I live in Mi and we have more dark, cold, gloomy days than sunny ones and I started to wonder what my neighbors are thinking everytime I walked out with coat and gloves and a plate of hot food and a camera, LOL...thank you for posting...following you now and subscribed!
Emily
Just wanted to let you know that I made a lightbox just like this at home, and posted the info on my blog with a link to this site. Your instructions worked perfectly! Thanks so much... btw, tissue paper isn't translucent enough to work as well as the muslin.
Heidi Fowler
I checked out your post, and your box looks fantastic! You're so lucky to have such nice lights! Thanks so much for coming back and sharing this feedback. I always like to hear how my projects turn out when they get tried by someone else! (Shared your post on my facebook page.)
Tara
Thank you so much! I made one today & I love it. I need to get some better lights but my husband said the pictures I took today look a lot better so I am thrilled :)
Aki
Thanks for the inspiration! I made one today, posting it on my blog and linking you up! Thanks again! :)
Nel Elaine
I have been looking for something like this - I now have my "to do" project for this weekend! I do have a quick question - what type of camera do you use?
Heidi @ OneCreativeMommy
Good luck, Nel! I use a Nikon D80 most of the time, but when my hubby has the camera, I use a regular point and shoot. I've had good luck with both.
Gwendolyn Simmins
Hello! I've had my lightbox for a couple of years but I've just redone it by using your tip of painting the inside of the box white. my lightbox looks even better than it did before! Thank you for the tip. By the way, the dull side of freezer paper also works to cover the cutouts.
Enjoy your day :)
Cindy {crazloucreations}
I'm trying this! Thank you so much--pictures are so important to the blog posts and I know I need to improve mine. I can't afford a brand new fancy camera, so I hope this will help me! Thanks!!
Heidi@OneCreativeMommy
I hope this helps, Cindy. I still have to photoshop the lighting on some pictures, but the light box makes a huge difference! I've been to your site often, and I love it. I'm off to check out your grilled shrimp & red potatoes. Yum!
Pamela M.
Hello, I recently created my own DIY Style Light-Box & then I discovered your blog this evening, I just thought perhaps I could possibly offer a couple of tips from my personal experiences of creating my box, * You can also Use {for the Sides & Top} , Either of the two .. Freezer Paper or Wax Paper, & Even Parchment Paper if it's whatcha got & you don't want to go out! ... And the 2nd thing, * If You Don't Have Paint Near By, You Can Cover the Entire Inside Of Your Box With A Few Different Things, & Theyre Cheap & Most people will have them at home.. cover the inside with White Tissue Paper {Gift Wrapping Supplies} .. Poster Board Works, even printer paper would work { if it doesn't appear thick enough! double up} ... I've made such a habit when I was raising my children, to work with what I've got at home, what I can find. Raising 4 children on ones own, well... You never have any money! Impervise! * Hope this helps someone, & good luck
Ben
Thank you so mich! Awesome!
I will sent this article for my mum. She'll love it fr making her ecommerce photos.
Natasha
Super! I have been playing around with my lighting I know this will most definitely help.
Angelique Jurd
Thank you. This is a brilliant post - I really struggle with photos and this is AMAZING. I will be making a light box this weekend. Your rock.
Heidi
I hope it works for you, Angelique. You will still have to edit, but it should give you a good place to start.